Tag Archives: sriracha

Surf & Turf Salad: Thai Style Quinoa Salad with Spicy Peanut Dressing

Thai style surf & turf quinoa salad

Upon returning home after traveling and dining out for a few days I was looking very much forward to a home cooked meal last night! After rustling through the cupboards and the freezer I settled on surf and turf in the form of a grouper fillet from my last trip to the Florida Keys, complimented by a small skirt steak. Neither was quite enough for a meal by itself but together I thought I could come up with something special for the two of us.

While exploring the fridge I also stumbled upon a bottle of Thai style peanut dressing I had made just before leaving town and that got me thinking salad would be just the ticket! The first order of business was making a Thai style marinade for the steak and a batch of quinoa that would complement those flavors. For the dressing I had used This Recipe from a blog that I follow and added only a teaspoon of tamarind paste and a splash of fresh coconut milk for a flavor boost.

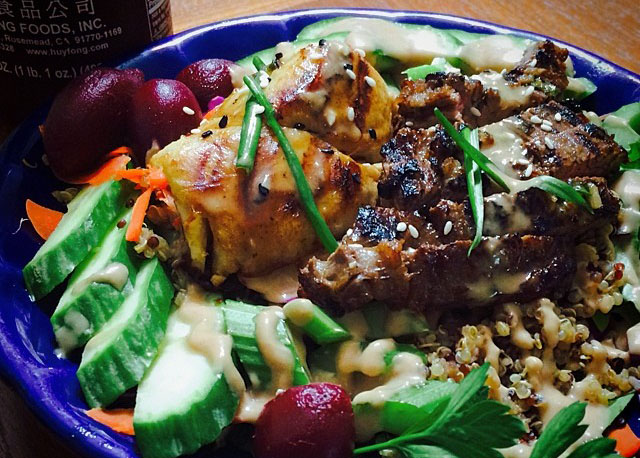
The salad itself was simply ingredients I had on hand; the base was a “Power Greens” salad mix with chopped red cabbage, grated carrots, and chopped celery. I tossed each portion gently with ½ cup each of the quinoa and garnished the salad with cucumber slices, fresh parsley, and some pickled baby beets that were also on hand. After dressing the salad I set the cooked fish and sliced steak on top and sprinkled everything with a few black and white sesame seeds. I also added a few raw cashews at the table as an afterthought (not in picture).

Thai Marinade for Steak or Fish

2 – Scallions, chopped
1 – 3 inch piece of Lemon Grass stalk, pounded to release flavor
¼ Cup Light Soy Sauce
1 Tbsp – Grape Seed Oil
1 Tbsp – Sesame Oil
1 Tbsp – Rice Wine Vinegar
1 Tbsp – Fresh Garlic, Minced
1 Tbsp – Fresh Ginger, Minced
1 Tbsp – Fresh Lime juice (about ½ of a lime)
1 Tbsp – Fresh lime zest (also about ½ of a lime)
½ Tsp – Sriracha or similar (or to taste)

Combine all ingredients and whisk to combine.  Soak steak until ready to grill (at least 30 minutes and up to 24 hours). Soak fish for no more than 20 minutes for best grilling results.

To prepare the meats: Preheat the oven to 400 degrees and the grill pan over medium high heat for 2-3 minutes. Brush the grill pan with a little grape seed oil and place the fish at an angle to the ridges in the pan. Cook 2-3 minutes (depending on thickness), turn and cook 2 minutes more. Place the fish on an oven proof dish and finish in the oven just until the flesh flakes easily with a fork.

While the fish is in the oven wipe the grill pan, heat the pan over medium high heat until smoking hot, brush the surface with a little more oil. Make sure your steak is trimmed of any excess fat or silverskin and and place the steak at an angle to the ridges in the pan. Cook without moving for 2-3 minutes, turn and cook 2-3 minutes more (depending on thickness). Rest the steak on a plate for at least 5 minutes before slicing ACROSS the grain.

Thai Flavored Quinoa

1 Cup – Quinoa, rinsed (I used Trader Joe’s Organic Tri Colored Quinoa)
2 Cups – Water
1 Tbsp – Dark Soy Sauce
1 Tbsp – Sesame Oil
1 Clove – Garlic, whole
2 – 3 inch pieces of Lemon Grass stalk, pounded to release flavor
Salt and fresh ground black pepper to taste

Warm a medium saucepan over medium heat, swirl in the sesame oil then stir in the quinoa, garlic, and lemon grass. Toast gently for about 5 minutes stirring occasionally or if you hear popping. Dissolve the dark soy sauce in the water then pour, while stirring, over the quinoa. Raise the heat to medium high and allow the mixture to come to a boil. Reduce the heat to low, cover the pan and cook 15 minutes more. Fluff the quinoa with a fork and allow it to cool before tossing into your salad, remove the lemon grass and garlic before serving.

To serve prepare your salad base of mixed greens (use your imagination!), grated carrots, cut celery, and red cabbage. Toss gently with ½ cup of quinoa per serving and garnish with sliced cucumbers, radishes, pickled beets or whatever else you like. Drizzle the salad with dressing, place your fish and sliced
steak on top and garnish with sesame seeds and a little sliced scallion.

Enjoy!

Speaking of Comfort Food – Pho Ga

Photo by KathyHuntPhoto.com

Even in the warmest months of the year I am still quite fond of soup. Because this is historically the season of lighter meals I will usually choose a broth based soup as opposed to the heavier chowders or other cream soups. Just lately too I have been feeling a little under the weather so I figured it was a perfect time for a pot of soup.

It was once chicken noodle soup that cured my blues, until I discovered miso soup, that is. With its salty essence of the sea combined with the health benefits of tofu and seaweed…miso soup just seemed so, well…healthy! Ah, but then I found Pho; a Vietnamese soup steeped with perfumey flavors of the orient in a warm and comforting bowl of goodness!

Pho is a light, broth based soup most commonly made with beef, featuring tender rice noodles, vegetables, and aromatic herbs and spices. Also very popular is Pho Ga, which is essentially the same soup, made with chicken. Upon reading Jaden’s Pho Ga post over at Steamy Kitchen this is the Pho I set out to make this past Sunday morning.

I decided I could come up with a reasonable facsimile of the broth using my good old standby chicken stock recipe along with a few additions I already happened to have in the pantry. I was very pleased with the results! Don’t let the length of the recipe scare you…it really comes together quite easily with the hardest part being the long slow simmering of the stock.

Starting right after my morning coffee I spent only 15 minutes getting the ingredients prepped and inside of 30 the stock was well under way. The garnishes on the other hand would require a trip to the market while the stock was simmering gently on the stove. As a bonus…the house smelled delicious by the time I got back from the store!

The garnishes by the way are the fun part of Pho! Usually served alongside so that you may add as much (or as little) as you like, the most common garnishes are: Hoisin sauce, Sriracha or other pepper sauces, sliced chili peppers, Thai basil, culantro, fresh lime, and bean sprouts. With so many to choose from, each bowl of Pho tastes just a little different depending on the individual diner.

Of special note: In this recipe I am using a technique for “Velveting” the chicken. I searched for what seemed like forever trying to find out just how Chinese and other Asian cuisines get their chicken so wonderfully tender and I have finally found it. Look for more about this technique in future posts!

Pho Ga

Notes: For the most authentic Pho flavor use a grill to brown the chicken parts instead of the oven. The spice quantities are approximate based on how strong you would like these flavorings to be.

Step 1 – Prepare a chicken stock as written in Singing the praises of Chicken Stock, omitting the Thyme and adding the following ingredients at the same time that you add the chicken pieces to the pot:

2 to 3 ounces – Fresh ginger root, about 2 inches, roughly chopped
2 to 3 pods – Star anise
3 to 4 – Whole cloves
1 Tbsp – Ground coriander
1 Tbsp – Whole celery seed
1 Tbsp – Dark agave nectar, or molasses

Step 2 – While the stock is cooking, “Velvet” the chicken…

Whisk together…

2 Tablespoons – Shaoxing wine
2 Tablespoons – Warm water
2 Tablespoons – Corn starch
1 – White of 1 large egg
1 – Pinch kosher salt

Then marinate 1 large chicken breast half, split lengthwise then sliced very thin, in this mixture for at least ½ hour, refrigerated.

Fill a wok (or a large wide frying pan) at least half full with water and bring to a boil. Add 1 tablespoon of sesame oil and reduce the heat to a steady simmer. Carefully add ½ of the chicken, drained of excess marinade, and cook for one minute gently separating the chicken slices to prevent clumping.

When the chicken is solid white and cooked through (about 1 to 1-1/2 minutes) remove to a strainer to drain. Repeat until all of the chicken is cooked setting the strainer over a bowl to drain. Refrigerate the chicken until ready to use. Note: I used a Chinese Spider Strainer for this cooking process and a traditional 8″ mesh strainer to drain the chicken.

Step 3 – Slice a large white onion first in half, then in paper thin slices. Soak the onion slices in cold water for at least 30 minutes.

Step 4 – Cook the noodles and serve…

Prepare one package of Bahn Pho (or Rice Noodles) per the directions on the package. Add a serving each of the noodles, the onion slices, and the prepared chicken to each serving bowl, then ladle over the broth to cover. Serve with your choice of bean sprouts, Hoisin sauce, Sriracha or other pepper sauces, sliced chili peppers, Thai basil, culantro, and fresh lime slices on the side.

Enjoy,

Randy

Fusion Recipe: Orange Beef with Rosemary Soy Sauce

Photo by Kathy

Much like our crock pot, the pressure cooker spends most of the time collecting dust on the bottom shelf of the bakers rack. And, also like the crock pot, every time I use our pressure cooker I end up saying “Man, I love this thing!” Invariably, I make a mental note vowing to use the pressure cooker more often. Considering how this dinner turned out…perhaps it’s time I kept one of those little promises to myself.

Some of my favorite and most beloved comfort foods are stews and braised dishes which are for the most part cooked long and slow. Not exactly weeknight fare if you will. But the pressure cooker brings it all within reach. This dish, prepared traditionally, could take as long as 4 hours to cook; on this night, thanks to the pressure cooker, dinner was on the table in just over an hour. Yep, that’s right; I made this on a Tuesday evening after work in a little more than an hour!

If you are unfamiliar with pressure cooking, there are some great articles on the web with two of my favorite sites being Miss Vickie’s and Fabulous Foods . As a bonus (much like braising) it is claimed that pressure cooking destroys far fewer nutrients than other cooking methods making it a healthy addition to your kitchen arsenal. If you do not own a pressure cooker, by all means start reading up on them…they are safe, convenient and I simply cannot recommend this cooking method enough!

Because pressure cooking happens so fast there is not always time for flavor to develop. To counter this trend I started this recipe cooking hot, almost like a stir fry, because I wanted to build up as much flavor as possible before putting on the lid. I call this recipe a fusion because I used red wine and rosemary which are not typical in an Asian style stew. As an afterthought, a few orange peels would also bump up the “citrusy” flavor and speaking of flavor, feel free to add a little more sriracha if you like things spicy.

I still had a bunch of fresh kale around so I served this stew simply spooned over quick braised kale with a little ginger, garlic, lower sodium soy sauce and a splash of water. Also I will include notes below for a traditional braise for those of you who will not be using a pressure cooker. P.S. If you go out and get one I promise to use my pressure cooker again before it has the time to gather that coat of dust!

Orange Beef with Rosemary Soy Sauce

1-1/2 Pounds – Beef chuck, trimmed and cut into roughly 1” cubes
1 – Medium Onion, halved lengthwise then sliced lengthwise
1 – Medium Daikon radish, peeled and cut into large cubes (the Daikon was about the size of a large cucumber)
½ Cup plus 1/8 Cup reserved – Fresh orange juice
½ Cup – Lower sodium soy sauce
¼ Cup – Dry red wine
3 Cloves – Garlic, minced
1-1/2 Tbsp – Fresh ginger, minced
1-1/2 Tbsp – Agave nectar
2 Sprigs – Fresh rosemary
1 Tbsp – Fish sauce
1 Tbsp – Corn Starch
½ Tbsp – Sriracha (Chinese red pepper sauce)
Fresh ground black pepper, to taste
Sesame oil
Olive oil
Sesame seeds and sliced green onions for garnish

In an uncovered pressure cooker over medium high heat, warm 1-1/2 Tbsp each of Sesame and Olive oil until shimmering. When the oil is quite hot, add the beef cubes and cook, stirring often, until any exuded liquid has evaporated and some browning has occurred. Add the onions and agave nectar to the beef and continue cooking and stirring about 1 minute before adding the garlic and ginger. Allow this to cook, while still stirring often, until the onions are transparent.

When the onions have become transparent stir in the red wine and as this comes to a boil, scrape up any browned bits that may have stuck to the cooking surface. Add all remaining liquid ingredients, the daikon radish cubes and the rosemary (leaving the reserved orange juice aside). Stir gently to mix the ingredients, and then lock on the lid to the pressure cooker.

Leave the heat on medium high until the pressure has reached optimal cooking pressure, then lower the heat to medium low. Cook 30 minutes while monitoring pressure, lowering or raising heat marginally as needed to maintain optimal pressure. After 30 minutes remove the pressure cooker from heat and allow it to cool naturally until the pressure falls to zero.

When the cooker is safe to open, carefully remove most of the stewed solids to a large serving bowl using a spider skimmer or a slotted spoon, leaving the sauce in the cooker. Return the cooker to heat and bring to a boil over medium high heat once more. In a small bowl, whisk the reserved orange juice and the corn starch together to form a slurry before stirring it immediately into the sauce. Continue stirring until the sauce returns to a boil and thickens slightly.

When the sauce has thickened, very gently fold the sauce back into the stew. Serve over brown rice, braised greens, or quinoa and garnish, if desired, with sliced green onions and sesame seeds.

Note: For a traditional braise follow the recipe to the point where the pressure cooker is closed (using a heavy bottomed Dutch oven rather than a pressure cooker). Cover the Dutch oven with a layer of aluminum foil, then a heavy lid and bake in a 325 degree oven for 1-1/2 hours. Check for doneness, re-cover and bake 30 minutes more if necessary. Then follow the recipe from the point at which the pressure cooker is opened.

Enjoy,

Randy