Tag Archives: green

Yard Sale Brunch: Personal Frittatas with Shrimp, Bacon, and Smoked Gouda

Shrimp & Bacon Frittatas

My wife Kathy and some of our friends had another yard sale today. As usual, once the tents and tables were up, I wanted to make a brunch treat to go along with their requisite mimosas. I had a shrimp and bacon frittata in mind based loosely on a pizza we’ve had at one of our favorite haunts in the Florida Keys. Trouble is, after picking up all of my ingredients last night I realized this morning that our oven is broken!

I was contemplating how to do a frittata on the grill when Kathy suggested I use the toaster oven and a muffin tin to make mini (personal) frittatas. What a novel idea! You don’t have to make yours in a muffin tin but they really were great for an outdoor brunch. They went perfectly with chilled fresh cantaloupe and the banana muffins someone else made…not to mention those mimosas!

I make frittatas often, sometimes even for dinner, and I always use this web article as a  guide: http://www.finecooking.com/articles/cyor/frittata.aspx. I know I’ve posted it before but really can’t recommend it enough…we have yet to be disappointed.

Shrimp and Bacon Frittatas with Smoked Gouda

24 – Medium Shrimp
8 – Large Eggs
6 slices – Thick Sliced Uncured Applewood Smoked Bacon, cooked (2 Slices Reserved)
1/2 Cup – Smoked Gouda Cheese, Grated
1/2 Cup – Heavy Cream
3 – Green Onions (about ¼ cup sliced)
1 Tbsp. – Unbleached All Purpose Flour
1 Tbsp. – Unsalted Butter, Melted
Kosher Salt
Freshly ground Pepper
Olive Oil Spray

Pre-heat the oven to 325 degrees. To prep the shrimp, dissolve 2 Tbsp. kosher salt in 4 cups of water. Peel and devein the shrimp and soak them in the salty water for a few minutes while preparing the other ingredients. Place another pan of water on the stove and start bringing this to a boil.

Slice the green onions diagonally into roughly 1/8 to 1/4 inch slices then cut 4 slices of bacon in half first lengthwise, then into ½ inch pieces. Grate the cheese and place together in a bowl with the onions and bacon.

When the pan of water has come to a boil strain the shrimp, blanch them in the boiling water for one minute, then strain them again. Toss these in a bowl with the melted butter then, when cool enough to touch, cut each shrimp crossway into 2 -3 bite sized pieces.

Whisk the eggs in a separate bowl with the cream and the flour, adding fresh ground pepper to taste. Then gently fold in the cheese, onion, and bacon mixture. Lastly, gently fold in the shrimp and you are now ready to make your frittata!

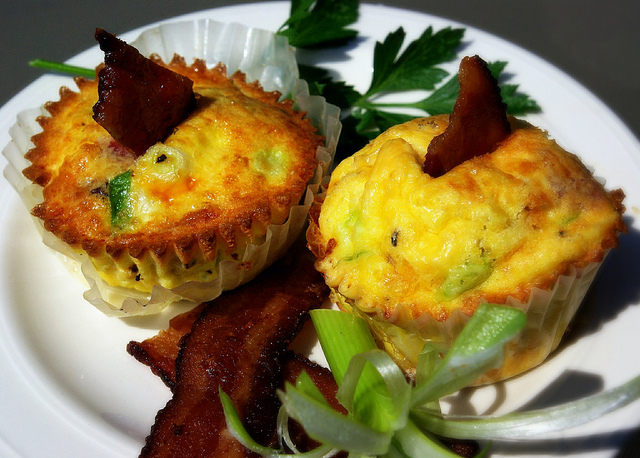
If you are going to use a muffin tin, line each cup with paper muffin cups. Give each cup a good spray of olive oil then using a very large spoon distribute the egg mixture as evenly as possible into twelve cups. Place the muffin tin carefully in the oven (or toaster oven) and bake 20 minutes, checking often after 15 minutes to make sure the tops don’t get too brown. Allow these to cool a few minutes before serving.

Before serving slice the remaining bacon pieces on an angle and garnish each personal frittata with a piece poked into the top.

Alternative cooking method: Heat 1 Tbsp. of olive oil in a 10 inch non-stick pan over medium-high heat. When the pan is hot, pour in the egg mixture evenly, reduce the heat to low and cover. Cook for 10 minutes until the eggs begin to set and finish in a 325 degree oven until set, 15 – 20 minutes.

Allow the pan to cool a little before carefully sliding the frittata onto a cutting board, cool a few more minutes, slice and…

Enjoy!

Oyako Donburi – A Little Warmth On A Rainy Night

Photo by kathyhuntphoto,com

Wikipedia defines Comfort Food as “food prepared traditionally, that may have a nostalgic or sentimental appeal, or simply provide an easy-to-eat, easy-to-digest meal rich in calories, nutrients or both”.

While I wouldn’t argue with any of the above I might add that, Comfort Food for me is often a dish that will comfort my soul following a rough time, can be a dish that reminds me of someone I care deeply about and most certainly, comfort food will warm the body on a cold day or the heart on a rainy one.

Getting back to the definition, Wikepedia goes on to say comfort foods can be “foods that have a nostalgic element either to an individual or specific culture” and this is where I get to my point. Oyako Donburi is a very well known comfort food in Japan and especially popular in Hawaii. It is a dish of chicken and eggs simmered in a warm broth and served in a bowl over rice.

In Japanese “Oyako” loosely translates to “parent and child” and “Donburi” is usually “bowl” or “rice bowl”. You may also see this dish called “Oyakodon” which is simply an abbreviation of the same. Vaguely similar in ingredients to the Vietnamese soup, Pho Ga, which has definitely become a comfort food for my wife and I, Oyako Donburi may well become our next new favorite.

Which brings me to today…it’s been raining steady here for two days straight and yesterday was a lazy, rainy Sunday.  It was the perfect day for making a big batch of homemade chicken stock and when the rain continued all day today, a comfort food meal seemed to be just what the doctor ordered. After a little research and some stovetop experimentation, Oyako Donburi was just the right prescription for a cozy night at home!

Notes: This recipe is not entirely authentic and is something of a fusion recipe as I use a Chinese method of “velveting” the chicken in step 1. Although you can skip this step and simply simmer the chicken pieces in the broth with the onions, I highly recommend taking the extra few minutes. The difference in flavor and texture is well worth the added effort.

Once the chicken is “velveted”, I prepare Step 3 one portion at a time for continuity…this step comes together fairly quickly. Feel free to experiment with ingredients; a Google search of Oyako Donburi recipes will give you many ideas from adding miso or cilantro to using bonito flakes (dried fish) for a variety of flavors.

Oyako Donburi

Begin by preparing enough brown rice for two 1 to 1-1/2 cup portions, then go to step 1 while the rice is cooking. The rice should be steaming hot when added to the bowls as it serves to finish cooking the eggs.

Step 1 – “Velvet” the chicken:

2 Tbsp – Dry sake
2 Tbsp – Warm water
2 Tbsp – Corn starch
1 – White of 1 large egg
1 – Good pinch of kosher salt
1 Large or 2 small – Chicken breast halves, split lengthwise then sliced crosswise into thin slices
1 Tsp – Sesame oil

Combine the first 5 ingredients and whisk only until well combined. Stir in the chicken pieces and marinate this mixture for at least ½ hour, refrigerated.

Fill a small wok (or a med sauce pan) at least half full with water and bring to a gentle boil. Add 1 tablespoon of sesame oil then carefully add ½ of the chicken, strained of excess marinade, and cook gently separating the chicken slices to prevent clumping.

When the chicken is solid white and cooked through (about 1-1/2 to two minutes) the chicken will begin to float. At that point, remove the chicken to a strainer to drain. Repeat until all of the chicken is cooked setting the strainer over a bowl to drain. Discard the water and if making ahead, refrigerate the chicken until ready to use. Note: I used a Chinese Spider Strainer for this cooking process and a traditional 8″ mesh strainer to drain the chicken.

Step 2 – Simmer and “bowl” the following 1 portion at a time

1/2 Cup – Fresh chicken broth
1 Portion – Chicken, prepared in step one
1 quarter – Large yellow onion, sliced in ¼” slices, divided
3 Med – Shitake mushroom caps, sliced in ¼” slices, divided
2 – Green Onions, sliced thin on a sharp angle (bias)
1/4 Cup – Fresh arugula (or spinach)
2 Tbsp – Dry sake
2 Tbsp – Tamari sauce
2 Tsp – Agave nectar
½ Tsp – Sesame Oil
2 eggs
Nori (Dried seaweed) for garnish

In a small wok or pan (I used a non-stick egg skillet) bring the broth to a gentle boil over medium high heat. Stir in the sake, tamari, agave nectar and sesame oil, then add the onion and mushroom slices. Simmer until the onions are just becoming translucent (about 5 minutes) then add the chicken from step 1 along with the arugula.

Simmer one minute more stirring to ensure even heating. (Note: If you are skipping step one, add the chicken one minute after the onions and mushrooms and simmer until cooked through, then add the arugula for one minute more.)

Crack the eggs into a bowl and beat just enough to break the yolks and slightly mix the eggs. Stir in half the sliced green onions then gently pour the eggs evenly over the top of the simmering broth. Cook 30 seconds, then using chop sticks, stir once just enough to distribute the eggs evenly, cover and cook 30 seconds more while you spoon the rice into a bowl for serving.

(If necessary microwave the rice for 30 seconds to make sure it’s hot then) Gently slide the cooked mixture out of the pan and into the bowl over 1 to ½ cups steaming hot rice.  Cover the bowl with a saucer and serve as the eggs finish cooking in the hot bowl. Garnish with the remainder of the sliced green onions and crumbled or sliced dried nori.

Enjoy!

Randy

Pan Fried Snapper with a Sesame Ginger Soy Glaze

What a busy week it has been! Kat cooked on Monday, we were out with friends for Vietnamese food on Tuesday, Wednesday I had the good fortune of being invited on a fishing trip, and Thursday it was pizza with more friends. Here it is Friday already and I haven’t cooked all week…it is a good night to stay in, have a quiet dinner, and perhaps watch a movie.

Getting back to that fishing trip; I think the warm weather here has the fish a little confused. We were out on the ocean from sunset until midnight and I only brought home 4 little fish. But fresh fish is fresh fish so I wanted to make the most of it. I knew we were busy on Thursday so I filleted the Snapper, and sealed 4 fillets airtight in a plastic bag, and put them on ice. The other 4 fillets were vacuum sealed and frozen for another day.

Fresh fish stays fresh for 2-3 days as long as you keep it cold…ice cold! For my taste, the refrigerator alone is not cold enough and flavor will deteriorate quickly unless the fish is kept on ice. I usually seal fish in an airtight zip lock or vacuum sealed bag then place it in a big bowl of ice. I cover that with another layer of plastic wrap over the top and put the whole thing on the bottom shelf of the fridge. This way, even if the ice melts a little bit, your fish stays nice & cold and doesn’t get waterlogged. Whole, cleaned fish will keep just as well stored the same way.

For this recipe I used boneless fillets. To get good browning it is important to that the fish is dry so after rinsing them I placed them on paper towels and patted them mostly dry, then I transferred them to another layer of paper towels and repeated the process. With sprinkling of salt & pepper…they were ready to go! The fish was served over a bed of Sautéed Spinach with Toasted Sesame Oil with Edamame and Brown Rice.

Pan Fried Snapper with a Sesame Ginger Soy Glaze

4 – 4 to 6 ounce Fillets, Snapper (Tilapia or Catfish would be a good substitute)
¼ Cup – Whole Wheat Flour
Kosher Salt & Fresh Ground Black Pepper

¼ Cup – Soy Sauce
¼ Cup plus 1/8 Cup – Dry White Wine, Divided
1 Tbsp – Agave Nectar
1 Tbsp – Toasted Sesame Oil
1 Tbsp – Rice Wine Vinegar
1 Tbsp – Fish Sauce
1 Tbsp – Fresh Ginger, Minced
1 Tbsp – Fresh Garlic, Minced
¼ Tsp – White Pepper
1 Tbsp – Dry Sesame Seeds
3 – Green Onions, Sliced
1 Tsp – Corn Starch

1 Tbsp – Sesame Oil
1 Tbsp – Canola Oil

Add the soy sauce and ¼ cup wine to a bowl along with the next 7 ingredients, reserve until fish is cooked. Add 1 tsp corn starch and 1/8 wine to another bowl and mix well (this creates a slurry), set aside.

Heat a non-stick pan over medium high heat adding the sesame and canola oil when hot. Pat the fish dry, season with salt & pepper and dredge in flour. Shake off any excess flour and cook the fish 2 fillets at a time browning well, about 2 minutes per side. Remove fish to a paper towel to drain.

When fish is done, discard any excess oil and add the reserved sauce. Raise the heat to high and as soon as the sauce comes to a boil, remove the pan from the heat and stir in the corn starch & wine slurry. When the sauce begins to thicken, stir in the green onions and sesame seeds.

Gently dip each piece of fish in the sauce to coat. Set the fish on the serving plate and spoon on additional sauce before serving.

Enjoy,

Randy

Penne with Italian Sausage, Fresh Tomatoes, Feta, & Herbs

For a weeknight dinner that is super easy to prepare try this Penne with Fresh Tomatoes, Feta, and Herbs. Want to mix things up a bit? Replace the sausage with bite sized cubes of cooked chicken or turkey breast, use whole grape tomatoes instead of chopped, or add capers and chopped green & black olives for a real Mediterranean twist. This pasta is great served with salad and a hunk of crusty whole wheat baguette and makes more than enough for lunches the next day.

Penne with Italian Sausage, Fresh Tomatoes, Feta, & Herbs

2 pounds tomatoes, halved, seeded, chopped
1 16 ounce package Chicken or Turkey Sweet Italian Sausage, sliced diagonally, browned well, and drained
1 cup green onions, green and white parts diagonally sliced
1 cup feta cheese, crumbled
6 tablespoons chopped fresh parsley
1 tablespoon chopped fresh oregano
1 tablespoon, chopped fresh garlic
1 teaspoon chopped fresh thyme
1/4 cup extra-virgin olive oil
1 13.5 ounce box Whole Grain Penne pasta

Mix first 8 ingredients in a large pasta bowl. Set mixture aside.

Cook pasta in large pot of boiling salted water until just tender but still firm to bite, stirring occasionally. Drain. Add hot pasta to tomato mixture and gently toss to coat. Add Olive Oil, Season to taste with salt and freshly ground black pepper and gently toss.

I Love Shrimp and Grits!

I love shrimp and grits and in my travels around the South I have enjoyed more than my fair share of some fine versions of this recipe. Unfortunately shrimp and grits dishes are nearly always loaded with salt and fat. Between the ham or bacon (or ham and bacon), heavy cream, and butter I would not call this dish particularly heart healthy. However if you think about it the main ingredients are not all that bad.

Shrimp – Surprisingly, ounce for ounce, shrimp are packed full of low-fat, low calorie protein, they are a good source of selenium, vitamins D and B12 and they actually provide more good cholesterol than bad! Note: If you are using frozen shrimp always buy shrimp that does not contain sodium triphosphate.

Grits – Grits are a very good source of antioxidants, dietary fiber, and iron.

Cheese – Cheese is one of the best sources of calcium in the world and it’s rich in phosphorus, zinc, riboflavin, vitamin B12, and vitamin A. This recipe contains cheddar cheese; did you know that aged cheeses like cheddar are actually good for people that are lactose intolerant? This is because aged cheeses contain very low levels of lactose and can be an important source of calcium for people that suffer from lactose intolerance.

My point is, while I don’t want to turn my blog into a “diet” or “nutrition” blog, I believe you can eat smart without having to sacrifice flavor and enjoyment. In this recipe I still use a little fat but every single ingredient brings health benefits to the table, the fat that it does contain is good fat, and your taste buds will still have a little fun!

Shrimp and Grits

Notes: There is no extra salt added to the recipe because the extra sharp cheddar and the blackening seasonings add enough salt for my taste. The Chipotle Tabasco brings a nice smokiness and the granulated garlic just seems to round out the flavor. If you prefer a “clean eating” style meal, feel free to use low fat cheddar cheese. I like to serve these with fresh spinach sautéed with chopped shallots and plenty of fresh ground pepper.

2 ½ Cups – Homemade chicken stock (or low-sodium canned broth)
¾ Cups – Quick cooking grits
¾ Cups – Extra sharp cheddar cheese, shredded
1 Tbsp – Plain nonfat yogurt
¼ Tsp – Granulated garlic
½ to 1 Tsp – Chipotle Tabasco sauce, depending on your taste
Fresh ground black pepper, to taste
1 Lb – Large shrimp (About 20), peeled, deveined, and patted dry
1 Bunch – Green onions, sliced on the bias (at an angle) in half inch slices
1 Clove – Garlc, peeled & minced
3/4 Tsp – Chef Paul Prudhomme’s Blackened Redfish Magic
1 Tbsp – Olive oil

Turn one burner on high and another on low. On the first burner bring the chicken stock to a boil in a large sauce pot with a tight fitting lid. Slowly whisk in the grits, chipotle Tabasco sauce, granulated garlic, and ground black pepper. Move the sauce pan to the burner that is set to low, whisk once more and cover. Stir occasionally and cook 7 or 8 minutes until the grits are thickened.

Toss the shrimp with the Blackening Seasonings.

Place a large sauté pan on the first burner (still on high) adding the olive oil as the pan gets hot. Stir in the garlic and keep stirring until you smell the garlic, about 30 seconds. Stir in the shrimp and cook without moving for the first minute. Shake the pan to loosen the shrimp and cook one minute more without moving. Add the green onions and toss (or stir) with the shrimp, remove the pan from the heat and set aside. (The shrimp will continue cooking with the pan off of the heat.)

When the grits have thickened remove the sauce pan from the heat and fold in the yogurt and the cheese. Continue folding until the cheese has thoroughly melted and blended with the grits. Serve 4 to 6 shrimp per serving over a generous mound of grits.

Enjoy!

Randy