Tag Archives: onion

By request: Beer Braised Corned Beef Brisket & Cabbage

I was asked to settle a debate this week and while I’m uncertain whether it was my food knowledge, my part Irish heritage, or simply my well known penchant for eating food that led them to me, I was more than happy to throw in my two cents. The question was “Is corned beef really Irish?” In fact, I told them, it is Irish but the tradition of eating corned beef and cabbage on St Patty’s day is uniquely American.

Historically corned beef (named so because the salt used in the process resembled corn kernels) or salt cured beef was an export of Ireland but rarely ever was it eaten by the locals. In those days Beef was generally too expensive for the common people and a dish of boiled “bacon” and cabbage was much more customary. What they called “bacon” was pretty much any part of the pig, other than the ham, that contained a joint…typically what we know as the shoulder or the loin.

Later, when Irish immigrants came to America, beef was actually far more available than pork so they “corned” the beef and cooked it with cabbage in an effort to replicate their comfort food from back home. Loosely, this is assumed to be the origin of the wholly American tradition of corned beef & cabbage on St. Patrick’s Day. Interestingly, to this day, corned beef and cabbage in Ireland is generally reserved for the tourists!

For a great read on the subject check out Europeancuisines.com .

Through the years I tried every method known to man for preparing corned beef including boiling, stove-top braising, baking and most recently sous vide. For depth of flavor and melt-in-your-mouth tenderness, this slow oven braise remains my go-to recipe for corned beef. Make enough for leftovers because the sandwiches are awesome and the chopped meat makes for an incredible corned beef hash!

Beer Braised Corned Beef Brisket & Cabbage

1 – 3 to 4 pound First cut corned beef (**See note)
1 or 2 cans – Guinness draft
10 to 12 – Mixed peppercorns (pink, green, black, etc…)
6 to 8 – Cloves of garlic, smashed
4 to 6 – Allspice berries
2 to 3 – Bay leaves
1 to 2 – Star anise pods

Note: Reserve vegetables for later. These can be added and cooked with the roast for the final hour of cooking or boiled in the pot juices while the roast  rests.

1 Head – Green or Napa cabbage, quartered
3 to 4 Large, or 4 to 6 Med – Red bliss potatoes
2 Med – White onions, halved

Pre-heat the oven to 300 degrees. Remove the corned beef from its packaging and rinse in cold water while rubbing with your hands to remove any scum left over from the brine. Place the roast, fatty side up, in a heavy-bottomed Dutch oven (or a pot with a tight fitting lid) and pour in enough beer to come about 1/3 of the way up the sides, sliding the roast around a little to get some liquid underneath. Add the remaining ingredients, distributing them evenly around the beef (if your roast is larger add more / if it is smaller add less of the spice).

Note: If your Corned Beef comes with a spice packet add that too…flavor is flavor!

On your stovetop over medium heat, bring the beer to a gentle boil then cover the pot tightly with aluminum foil placing the Dutch oven lid on top of that for a nice firm seal. Place the whole thing in the oven and roast, without peeking for 3 – ½ to 4 hours again depending on the size. The beef should be very tender after 4 hours…if not put it back in the oven and check it every 30 minutes until it is very tender.

Remove the corned beef and wrap it in the foil to rest. Meanwhile, place quartered cabbage (cut side down), red bliss potatoes, and white onion halves in the cooking liquid, return to a boil, cover and cook for 15 minutes while the Corned Beef is resting. After 15 to 20 minutes of rest, slice the Corned Beef, across the grain and serve with vegetables and your favorite Dijon Mustard.

**Note: Corned beef is generally sold as Whole Brisket, Half Brisket – First Cut (or Flat), or Half Brisket – Point Cut. The first cut (or Flat) is my favorite. This cut comes from the wide flat half of the whole brisket with the Point Cut coming from the thicker, fattier end of the Brisket. The First Cut is generally leaner and more suitable for the dinner plate. The Point Cut is “generally” fattier and more suitable for sandwiches. Hence, most of the time when you see a sale on corned beef it will be the Point Cut. Do yourself a favor and stick with the First Cut.

Enjoy,

Randy

Oyako Donburi – A Little Warmth On A Rainy Night

Photo by kathyhuntphoto,com

Wikipedia defines Comfort Food as “food prepared traditionally, that may have a nostalgic or sentimental appeal, or simply provide an easy-to-eat, easy-to-digest meal rich in calories, nutrients or both”.

While I wouldn’t argue with any of the above I might add that, Comfort Food for me is often a dish that will comfort my soul following a rough time, can be a dish that reminds me of someone I care deeply about and most certainly, comfort food will warm the body on a cold day or the heart on a rainy one.

Getting back to the definition, Wikepedia goes on to say comfort foods can be “foods that have a nostalgic element either to an individual or specific culture” and this is where I get to my point. Oyako Donburi is a very well known comfort food in Japan and especially popular in Hawaii. It is a dish of chicken and eggs simmered in a warm broth and served in a bowl over rice.

In Japanese “Oyako” loosely translates to “parent and child” and “Donburi” is usually “bowl” or “rice bowl”. You may also see this dish called “Oyakodon” which is simply an abbreviation of the same. Vaguely similar in ingredients to the Vietnamese soup, Pho Ga, which has definitely become a comfort food for my wife and I, Oyako Donburi may well become our next new favorite.

Which brings me to today…it’s been raining steady here for two days straight and yesterday was a lazy, rainy Sunday.  It was the perfect day for making a big batch of homemade chicken stock and when the rain continued all day today, a comfort food meal seemed to be just what the doctor ordered. After a little research and some stovetop experimentation, Oyako Donburi was just the right prescription for a cozy night at home!

Notes: This recipe is not entirely authentic and is something of a fusion recipe as I use a Chinese method of “velveting” the chicken in step 1. Although you can skip this step and simply simmer the chicken pieces in the broth with the onions, I highly recommend taking the extra few minutes. The difference in flavor and texture is well worth the added effort.

Once the chicken is “velveted”, I prepare Step 3 one portion at a time for continuity…this step comes together fairly quickly. Feel free to experiment with ingredients; a Google search of Oyako Donburi recipes will give you many ideas from adding miso or cilantro to using bonito flakes (dried fish) for a variety of flavors.

Oyako Donburi

Begin by preparing enough brown rice for two 1 to 1-1/2 cup portions, then go to step 1 while the rice is cooking. The rice should be steaming hot when added to the bowls as it serves to finish cooking the eggs.

Step 1 – “Velvet” the chicken:

2 Tbsp – Dry sake
2 Tbsp – Warm water
2 Tbsp – Corn starch
1 – White of 1 large egg
1 – Good pinch of kosher salt
1 Large or 2 small – Chicken breast halves, split lengthwise then sliced crosswise into thin slices
1 Tsp – Sesame oil

Combine the first 5 ingredients and whisk only until well combined. Stir in the chicken pieces and marinate this mixture for at least ½ hour, refrigerated.

Fill a small wok (or a med sauce pan) at least half full with water and bring to a gentle boil. Add 1 tablespoon of sesame oil then carefully add ½ of the chicken, strained of excess marinade, and cook gently separating the chicken slices to prevent clumping.

When the chicken is solid white and cooked through (about 1-1/2 to two minutes) the chicken will begin to float. At that point, remove the chicken to a strainer to drain. Repeat until all of the chicken is cooked setting the strainer over a bowl to drain. Discard the water and if making ahead, refrigerate the chicken until ready to use. Note: I used a Chinese Spider Strainer for this cooking process and a traditional 8″ mesh strainer to drain the chicken.

Step 2 – Simmer and “bowl” the following 1 portion at a time

1/2 Cup – Fresh chicken broth
1 Portion – Chicken, prepared in step one
1 quarter – Large yellow onion, sliced in ¼” slices, divided
3 Med – Shitake mushroom caps, sliced in ¼” slices, divided
2 – Green Onions, sliced thin on a sharp angle (bias)
1/4 Cup – Fresh arugula (or spinach)
2 Tbsp – Dry sake
2 Tbsp – Tamari sauce
2 Tsp – Agave nectar
½ Tsp – Sesame Oil
2 eggs
Nori (Dried seaweed) for garnish

In a small wok or pan (I used a non-stick egg skillet) bring the broth to a gentle boil over medium high heat. Stir in the sake, tamari, agave nectar and sesame oil, then add the onion and mushroom slices. Simmer until the onions are just becoming translucent (about 5 minutes) then add the chicken from step 1 along with the arugula.

Simmer one minute more stirring to ensure even heating. (Note: If you are skipping step one, add the chicken one minute after the onions and mushrooms and simmer until cooked through, then add the arugula for one minute more.)

Crack the eggs into a bowl and beat just enough to break the yolks and slightly mix the eggs. Stir in half the sliced green onions then gently pour the eggs evenly over the top of the simmering broth. Cook 30 seconds, then using chop sticks, stir once just enough to distribute the eggs evenly, cover and cook 30 seconds more while you spoon the rice into a bowl for serving.

(If necessary microwave the rice for 30 seconds to make sure it’s hot then) Gently slide the cooked mixture out of the pan and into the bowl over 1 to ½ cups steaming hot rice.  Cover the bowl with a saucer and serve as the eggs finish cooking in the hot bowl. Garnish with the remainder of the sliced green onions and crumbled or sliced dried nori.

Enjoy!

Randy

A Healthier Hash – Ground Turkey Hash

Photo by KathyHuntPhoto.com

I think I have mentioned before how much I loved my Mom’s corned beef hash (topped with poached eggs) when I was a kid. She pretty much always prepared it with the canned version and even as an adult I’ve made it quite often. As my eating habits have become more conscientious though, I’ve felt more and more hesitant to use the canned stuff, especially corned beef hash. Sure, I’ll eat fresh corned beef, steaks and burgers too, all in moderation of course. But when I open that can of corned beef hash and see all that greasy looking congealed fat I can almost feel it clogging my arteries as I cook it.

So this past weekend I had a package of ground turkey that needed to be used and being that it was Super Bowl Sunday I wanted a “Super” brunch. Hence what I’ll call “A Healthier Hash” using the ground turkey along with a few other things from the pantry. In order to replicate the corned beef hash flavor I started with a few ingredients common to corned beef including allspice and bay. Then, for the sake of either color or flavor I got a little creative with the mixture.

Cooking down the broth step by step not only ensures that the potatoes get cooked through; the flavor of the dish really gets a nice boost from the broth. During the last 10 minutes of cooking, be sure to let the hash cook without stirring as often. This allows for some nice browning to form on the bottom; those crunchy bits are packed full of flavor. Lowering the heat a little will help keep it from burning as it browns. The whole process takes about an hour but for all that flavor and a whole lot less fat; I thought it was well worth the effort. I hope you do too!

Ground Turkey Breakfast Hash

1 Lb – Ground Turkey (97% Lean)
1 Cup – Yukon Gold or Red Bliss potatoes, diced ¼ to ½ inch
1 Cup – Homemade or lower sodium chicken stock, divided
1 – Medium yellow onion, chopped
1 Clove – Garlic, minced
3 – Whole allspice berries
1 Sprig – Fresh rosemary
1 Star – Star anise
1 – Bay leaf
1 Tbsp – Ground turmeric
1 Tsp – Paprika
Kosher Salt & Fresh ground black pepper, to taste
1 Tbsp – Olive Oil
¼ Cup – Fresh Italian parsley, chopped

Pre-heat a 12” non-stick pan over med-high heat and when the pan is hot add the olive oil and swirl in the pan to coat. Stir in the potatoes, onions, and garlic then add the allspice, rosemary, star anise, and bay leaf. Cook while stirring often until the onion begins to become transparent (about 5 minutes). Add the ground turkey, breaking it up as much as possible as you add it to the pan. Stir the mixture and continue to cook about 10 minutes more, stirring often and breaking the turkey into smaller pieces as it cooks.

When the turkey is nearly cooked lower the heat to medium and add about ¼ cup of the broth along with a few grinds of ground black pepper, the turmeric and the paprika. Stir the mixture well then cook, stirring less frequently until the pan is nearly dry (about 8-10 minutes). Continue this process, adding ¼ cup of broth at a time, until all of the broth has been cooked down, the potatoes are cooked through and some browning has begun. Before finishing, remove and discard the bay leaf, rosemary sprig, star anise, and allspice.

To finish, taste for seasonings and add kosher salt and fresh ground black pepper to your taste. Stir in the chopped parsley and served topped with eggs cooked to your liking.

Enjoy!

Randy

Zucchini & Mushrooms Stuffed with Ground Turkey and Quinoa


Do I seem to be on a quinoa binge lately? Honestly, I am not obsessed with the stuff, although I will admit we have been eating a lot of it, and why not? The more I read about this Miracle Grain the more benefits they seem to discover; everything from it being a complete protein to being heart healthy. Consider that and the fact that it tastes pretty good and it’s not really a stretch to go with the quinoa over the rice or the mashed potatoes.

Add versatility and value (a cup or two of quinoa goes far!) to the mix and I’m sold. Just recently I have eaten quinoa as a side dish (yep, like rice or mashed potatoes), in casseroles, and even in salads, the latter of which was a favorite that I plan to explore even more in days to come. I have “heard” of quinoa in bars, like granola, in flakes like cereal, and even cooked like a risotto which frankly I do have my doubts about. Some things, such as a velvety, creamy risotto, are indeed sacred!

Nevertheless, tonight I was pondering how to use some plain quinoa I had left over from a previous dinner along with a package of ground turkey. I didn’t want to cook another casserole and meatloaf with quinoa just sounded a bit too farfetched so I thought…how about a stuffing? Yeah, a stuffing sounded good, especially a sausage stuffing with a little kick and maybe some nice gooey melted cheese.

This recipe made such a large batch that I only used about half to stuff enough zucchini and mushrooms for Kathy and I with leftovers for lunch. The rest will freeze well for a another meal which definitely makes the recipe a great way to stretch those dinner dollars! Pre-cooked brown rice, barley, or even bulgur would all work very well in place of the quinoa.

Quinoa and Ground Turkey Stuffed Zucchini & Mushrooms

For the stuffing…

8 oz – Medium Mushrooms (I used 8 baby bellas)
8 oz – Medium Zucchini (3 whole)
1 Package – Ground Turkey (about 1.2 Lbs)
1 – Medium Onion, chopped
1 – 28 oz can Crushed Tomatoes
1- 9 oz Bag of pre-washed Baby Spinach
2 Cups – Quinoa, pre-cooked
½ Cup – Dry White Wine, divided
¼ Cup – Fresh Parsley, chopped
1/4 Cup – Freshly grated Parmesan cheese
2 Cloves – Garlic, minced
1 Tsp. – Fennel Seed, crushed
About 1 Tsp. – From McCormick Italian Herb Seasoning Grinder
Kosher Salt & Fresh Ground Black Pepper
Olive Oil

Clean the mushrooms, removing and reserving the stems. Wash the zucchini well, cut in half lengthwise and scoop out the centers to form a cup for the stuffing. Reserve the centers and chop them along with the mushroom stems.

Heat 2 Tbsp. of olive oil over medium high heat. When the oil begins to shimmer, stir in the chopped mushroom and zucchini stems & pieces. Add the garlic and about 1 tsp. from the Italian Herb Seasoning Grinder and continue cooking until most of the liquid has evaporated. Add the onion and cook, stirring until the onion is translucent. Stir in the ground turkey along with the fennel seed and cook using a spatula to break up the turkey. Continue stirring and cooking until the turkey appears mostly cooked.

Add ¼ cup of wine and stir, scraping up any browned bits that have stuck to the pan. Continue cooking, stirring occasionally until most of the wine has evaporated. Stir in the tomatoes, bring to a simmer, and cook 5 minutes then fold in the spinach and cook 5 minutes more.

Fold in the quinoa and 1/4 cup of wine and continue folding gently to incorporate. Remove from heat and fold in the parsley and parmesan cheese just before using.

To prepare the Zucchini and Mushrooms…

Cleaned Mushrooms & Zucchini (from above)
McCormick Italian Herb Seasoning Grinder
Olive Oil
Sharp Provolone Cheese slices

Pre-heat the oven to 425 Degrees. Place the Zucchini and Mushrooms on a cookie sheet and drizzle with olive oil then season with the Italian Herb Seasoning Grinder. Bake 10 minutes and remove mushrooms, bake the zucchini 5 minutes more. Drain any juices from the mushrooms into the stuffing and mix well.

Mound stuffing onto the mushrooms and zucchini. Drape with enough Provolone Cheese to cover and bake 10 minutes more.

Enjoy,

Randy

Pan Fried Snapper with a Sesame Ginger Soy Glaze

What a busy week it has been! Kat cooked on Monday, we were out with friends for Vietnamese food on Tuesday, Wednesday I had the good fortune of being invited on a fishing trip, and Thursday it was pizza with more friends. Here it is Friday already and I haven’t cooked all week…it is a good night to stay in, have a quiet dinner, and perhaps watch a movie.

Getting back to that fishing trip; I think the warm weather here has the fish a little confused. We were out on the ocean from sunset until midnight and I only brought home 4 little fish. But fresh fish is fresh fish so I wanted to make the most of it. I knew we were busy on Thursday so I filleted the Snapper, and sealed 4 fillets airtight in a plastic bag, and put them on ice. The other 4 fillets were vacuum sealed and frozen for another day.

Fresh fish stays fresh for 2-3 days as long as you keep it cold…ice cold! For my taste, the refrigerator alone is not cold enough and flavor will deteriorate quickly unless the fish is kept on ice. I usually seal fish in an airtight zip lock or vacuum sealed bag then place it in a big bowl of ice. I cover that with another layer of plastic wrap over the top and put the whole thing on the bottom shelf of the fridge. This way, even if the ice melts a little bit, your fish stays nice & cold and doesn’t get waterlogged. Whole, cleaned fish will keep just as well stored the same way.

For this recipe I used boneless fillets. To get good browning it is important to that the fish is dry so after rinsing them I placed them on paper towels and patted them mostly dry, then I transferred them to another layer of paper towels and repeated the process. With sprinkling of salt & pepper…they were ready to go! The fish was served over a bed of Sautéed Spinach with Toasted Sesame Oil with Edamame and Brown Rice.

Pan Fried Snapper with a Sesame Ginger Soy Glaze

4 – 4 to 6 ounce Fillets, Snapper (Tilapia or Catfish would be a good substitute)
¼ Cup – Whole Wheat Flour
Kosher Salt & Fresh Ground Black Pepper

¼ Cup – Soy Sauce
¼ Cup plus 1/8 Cup – Dry White Wine, Divided
1 Tbsp – Agave Nectar
1 Tbsp – Toasted Sesame Oil
1 Tbsp – Rice Wine Vinegar
1 Tbsp – Fish Sauce
1 Tbsp – Fresh Ginger, Minced
1 Tbsp – Fresh Garlic, Minced
¼ Tsp – White Pepper
1 Tbsp – Dry Sesame Seeds
3 – Green Onions, Sliced
1 Tsp – Corn Starch

1 Tbsp – Sesame Oil
1 Tbsp – Canola Oil

Add the soy sauce and ¼ cup wine to a bowl along with the next 7 ingredients, reserve until fish is cooked. Add 1 tsp corn starch and 1/8 wine to another bowl and mix well (this creates a slurry), set aside.

Heat a non-stick pan over medium high heat adding the sesame and canola oil when hot. Pat the fish dry, season with salt & pepper and dredge in flour. Shake off any excess flour and cook the fish 2 fillets at a time browning well, about 2 minutes per side. Remove fish to a paper towel to drain.

When fish is done, discard any excess oil and add the reserved sauce. Raise the heat to high and as soon as the sauce comes to a boil, remove the pan from the heat and stir in the corn starch & wine slurry. When the sauce begins to thicken, stir in the green onions and sesame seeds.

Gently dip each piece of fish in the sauce to coat. Set the fish on the serving plate and spoon on additional sauce before serving.

Enjoy,

Randy

Singing the praises of Chicken Stock

Singing the praises of Chicken Stock

As I populate my blog with more and more recipes you will notice that chicken stock will show up in the ingredients over and over again. Indeed, I use chicken stock in a ton of different ways and find it to be an invaluable ingredient especially in healthful cooking. Aside from the obvious soups, risottos, and sauces I use chicken stock in place of water nearly every time I cook rice or couscous. Adding a little chicken stock to simmered beans adds body and richness, especially if you are going to make a puree. And, don’t forget those veggies either! A little stock boosts the flavor of blanched then sautéed vegetables nearly as well as a pat of butter and with much less fat.

Inasmuch as I tout the glories of chicken stock, I cannot emphasize enough how much better it tastes if you take the time to make your own! While I will at times use a canned chicken “broth”, there is simply nothing better than homemade. I say “broth” because I have yet to find a commercial stock that comes even close to the goodness of homemade. If I must used canned broth, I nearly always go with my favorite, Swanson’s Certified Organic Chicken Broth . For flavor, sodium level, and value, most others pale in comparison.

So what is the difference between stock and broth? To put it simply, stock utilizes more bones than meat in its preparation and nearly always involves browning of the ingredients before simmering.  Broth on the other hand uses more meat than bones and generally involves no browning of the ingredients before simmering. Stock is typically cooked longer than broth and usually contains less salt. While the two are entirely interchangeable, stock is essentially a richer more flavorful version of broth which is why it is preferred in sauce-making while broth is used more often in soups. Because I always seek to maximize flavor in my cooking, I nearly always use stock.

What is my secret to a good pot of chicken stock? Store-bought Rotisserie Chicken no less!

Out of habit, I freeze all of our chicken scraps stashed in a zip lock bag and when I have enough saved up, I make stock. While I have long browned my chicken parts before making stock, when I started buying Rotisserie Chickens from Costco for quick dinners on busy nights, I noticed an immediate improvement in the richness of my stock. Maybe it is the browning the rotisserie imparts on these chickens or maybe it is the marinade they use. Whatever the case the difference is remarkable enough that before I make a pot of stock I always wait until at least half of my stash of ingredients is from these chickens. To add additional flavor I also freeze any fresh herbs or vegetables (IE: onions, garlic cloves, apples, etc…) that were originally cooked with a home cooked chicken. Brown these right along with your chicken and you would be amazed how much flavor they can bring to the party!

When I make a batch of chicken stock, for convenience alone, I keep a quart or so in the fridge for up to a week. The rest I freeze in usable batches of 2 cup and ½ cup measures. For the former I pour two cups of cooled stock into a 1 quart Zip Lock Freezer bag, squeeze out the excess air, seal and stack them in the freezer. For an approximate ½ cup portion I pour the cooled stock evenly into a silicone muffin pan, cover loosely with stretch wrap, and freeze. The next day I pop the frozen portions out and store them neatly in another Zip Lock Freezer Bag. An ice tray does the same trick for even smaller portions but I don’t usually bother. I am a big stickler for fresh foods and perhaps it is because I go through it so fast but I really haven’t noticed a difference between fresh or frozen homemade stock.

Please remember, for the sake of food safety it is always best to refrigerate or freeze your stock as soon as it comes close to room temperature. To hasten cooling you can:

  • Pour the hot stock in to smaller and/or flatter containers to cool.
  • Set your stock pot into a sink or tub of ice water or even cold water, refreshing the water a time or two as it gets warm.
  • Freeze water a day or two ahead of time in a sanitized an empty ½ gallon milk container. Gently place the frozen container into your stock.
  • Fill a gallon sized Zip Lock Bag with ice cubes. Gently lower this into your “warm”stock.

Google “food safety” if you have any doubts and always use care in your handling of any food.

Homemade Chicken Stock

1 – One gallon Zip Lock Bag stuffed full of chicken necks, wing tips, and carcasses, thawed.
1 – Large yellow onion, sliced very thin
3 – Branches celery including leaves, chopped
2 – Large carrots, chopped
2 – Large garlic cloves, crushed
12 – Black peppercorns
1 – Tablespoon kosher salt
4 – Springs fresh thyme (or 1 Tbsp dried)
1 – Bay leaf
Olive Oil spray or mist
Fresh water to cover all by 1 inch.
Kosher salt & fresh ground black pepper to taste.

Preheat the oven to 425 degrees. Grease a cookie sheet with an olive oil spray or mist. Cut or chop chicken into manageable sized pieces and spread evenly on cookie sheet. Mist lightly with olive oil spray or mist then season generously with kosher salt and freshly ground pepper. Place in upper third of oven and cook 20 minutes undisturbed. Carefully remove and cool for safe handling. (Note: If chicken pieces do not show substantial browning, bake 8 to 10 minutes more before continuing.)

Meanwhile, coat the bottom of a large stock pot with a spray of olive oil and cook the remaining ingredients over medium-low heat, stirring occasionally, to release flavor.

When the chicken is cool enough to handle, add all of it including any collected juices, to the stock pot. Carefully swirl a small amount of fresh water in the cookie sheet to dissolve any browned bits and add this to the stock pot. Pour in enough fresh water to cover all ingredients by about 1 inch. Increase heat to high and monitor closely until nearly boiling, skimming off any excess foam. When the liquid reaches a near mild boil reduce the heat to simmer and cook 3 to 4 hours checking from time to time to keep from reaching a full boil.

After 3 – 4 hours remove the stock pot from heat and allow to cool somewhat before straining. When the stock has cooled enough to handle, using a slotted spoon, remove the largest solids to a colander or sieve set in a bowl to capture any draining stock. When most of the solids have been removed, strain remaining stock through cheesecloth or a sanitized dish cloth to clarify. Skim any remaining fat as it accumulates at the surface and/or remove any fat accumulations after the stock had been refrigerated.

Enjoy!

Randy

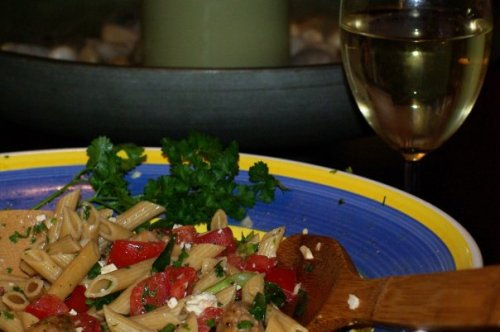
Penne with Italian Sausage, Fresh Tomatoes, Feta, & Herbs

For a weeknight dinner that is super easy to prepare try this Penne with Fresh Tomatoes, Feta, and Herbs. Want to mix things up a bit? Replace the sausage with bite sized cubes of cooked chicken or turkey breast, use whole grape tomatoes instead of chopped, or add capers and chopped green & black olives for a real Mediterranean twist. This pasta is great served with salad and a hunk of crusty whole wheat baguette and makes more than enough for lunches the next day.

Penne with Italian Sausage, Fresh Tomatoes, Feta, & Herbs

2 pounds tomatoes, halved, seeded, chopped
1 16 ounce package Chicken or Turkey Sweet Italian Sausage, sliced diagonally, browned well, and drained
1 cup green onions, green and white parts diagonally sliced
1 cup feta cheese, crumbled
6 tablespoons chopped fresh parsley
1 tablespoon chopped fresh oregano
1 tablespoon, chopped fresh garlic
1 teaspoon chopped fresh thyme
1/4 cup extra-virgin olive oil
1 13.5 ounce box Whole Grain Penne pasta

Mix first 8 ingredients in a large pasta bowl. Set mixture aside.

Cook pasta in large pot of boiling salted water until just tender but still firm to bite, stirring occasionally. Drain. Add hot pasta to tomato mixture and gently toss to coat. Add Olive Oil, Season to taste with salt and freshly ground black pepper and gently toss.