Tag Archives: butter

By Request: Pan Seared Fish with a simple Lemon Buerre Blanc

17620112_10213526208097874_2540471774217116928_o

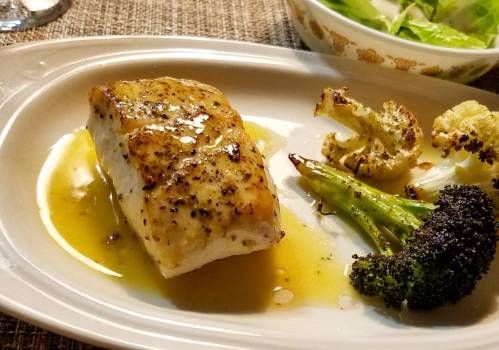
I was so pleased to find fresh Pacific Halibut at my local Costco this week! The fish was glistening and moist looking and sprung back immediately when I gave it a good poke with my finger, a good sign of freshness. I couldn’t wait to get home and give it a taste!

With a quality fish this fresh I usually keep the preparation simple. I like to enhance, not overpower, the flavor of the fish itself. I cut these fillets into portions, patted them dry on each side, then seasoned them with nothing but a little salt & fresh ground black pepper with a dusting of Old Bay Seasoning.

I warmed 2 tablespoons of grapeseed oil in a saute pan over medium high heat until the oil was shimmering then gently placed the fish into the pan…the rest is tasty, melt in your mouth history and you can read the details in the recipe below. Mmm Mmm Good!

Note: If you want to jazz this sauce up there are many variations; add a little white wine, some chopped shallots, or a splash of heavy cream and reduce these along with the lemon juice for a little extra flavor.

Pan Seared Fish with Lemon Buerre Blanc

2 to 4 – (6 Ounce) Firm white fish fillets at least 1” thick. (Such as Mahi-Mahi, Grouper, or Halibut)

1 Ounce – Freshly squeezed lemon juice (About 2 Tablespoons)

4 Tablespoons – Unsalted Butter, cut in roughly ½” cubes (1/2 Stick)

2 Tablespoons – Grape Seed oil (Olive oil or Canola is fine!)

Salt & fresh ground black pepper, to taste

Old Bay Seasoning, to taste.

Pre-heat the oven to 350 and using a paper towel pat the fish to dry the surface very well. Season both sides with salt & pepper and a little Old Bay then heat 2 tablespoons of oil in a non-stick pan over medium-high heat until shimmering hot.

Swirl the pan to evenly coat the cooking surface then carefully place the fish, skin side up / flesh side down, in the pan. Cook 3 minutes (without moving) then gently turn over and cook 3 minutes more. Carefully remove the fish to an oven-proof dish and place it in the oven to finish cooking through.

While the pan is still hot pour out any excess oil and with the pan still off the heat add the lemon juice. Swirl the sizzling juice for about 30 seconds then return the pan to the heat to reduce the moisture. Simmer, swirling the pan from time to time until the liquid begins to thicken, about 3 minutes. Remove the pan from heat and add the butter cubes a few at a time swirling the pan as they melt. Still off the heat, continue swirling in the butter cubes until all are incorporated into a rich sauce.

The fish should be done about the same time as the sauce. Check to make sure the fillets have cooked through, leaving it in the oven a little longer if necessary. (Never overcook fish!) Carefully remove the fish from the oven and place each fillet on a plate. Spoon a little the sauce over each fillet and serve.

Butter vs Olive Oil – Penne with Shrimp, Fresh Herbs and Lemon

Photo by KathyHuntPhoto.com

There was a time when most any meal I set out to cook began with a big glob of butter melting in a hot pan. Whether it was sautéing onions for a casserole, browning chicken for a braise, or scrambling an egg; it all started with butter. Then as I began reading about nutrition and becoming more conscious of my health, slowly but surely I transitioned to olive oil. Quietly and gradually, somewhere over the last few years, olive oil became my butter.

Through most of my years of cooking, it was not unusual for me to use a pound of butter per week, or at least every couple of weeks. Nowadays it is a rare purchase indeed and though I still keep (un-salted) butter around for a special treat in a pan-sauce or on my Sunday morning toast…I can honestly say the transition is complete. And why not?

Butter is a saturated fat too much of which can contribute to the build-up of blood cholesterol – Olive oil actually contains anti-oxidants and monounsaturated fats that have been proven to help lower cholesterol. Olive oil also contains vitamins E, K, and A, powerful anti-inflammatory properties and a host of other health benefits.

So why eat butter at all? Well, aside from that wonderful flavor there are a few good things about butter. For one, it does not contain any trans-fat, it also contains beneficial vitamins and minerals, can be high in Omega 3, and can even help your body fight off cancer cells. There is a great article at getmybodyback.com that discusses the details.

To my thinking these days, a little butter goes a long way…It’s a good fit in my “everything in moderation” theory that I mention so often. Butter is not inherently evil but it can easily be too much of a good thing. If you balance it out with a good bit of olive oil though, I think you can find a happy medium that will help you live a longer and more enjoyable life.

Recipe notes: This recipe uses olive oil as the base for the “sauce”. It is surprising in that it is not dripping in fat or greasy tasting. The idea is to coat the pasta rather than drenching it in a heavy sauce. The recipe comes together very quickly so I recommend having all of your ingredients ready to go by the time the pasta is almost ready to drain.

Penne with Shrimp, Fresh Herbs and Lemon

1 Lb – Med fresh shrimp, peeled & deveined
1/3 Cup – Extra virgin olive oil
3 Tbsp – Fresh garlic, minced
2 Sprigs – Fresh thyme
½ Tsp – Dried red pepper flakes
8 Oz – Dried 100% whole wheat penne
Juice of ½ Lemon
1 to 2 Tbsp – Fresh basil chiffonade
Fresh Parmesan cheese
Kosher salt & fresh ground black pepper

Add a tablespoon of kosher salt to a large pot of water over medium-high heat. When the water comes to a boil gently stir in the pasta. Continue stirring occasionally and cook 8 to 10 minutes or until the pasta has softened to your desired doneness.

When the pasta is roughly two minutes from being done, heat the olive oil in a large sauté pan over medium high heat. When the oil is hot, stir in the garlic, thyme, red pepper flakes and about ¼ teaspoon of fresh ground black pepper. Stir constantly for about 30 seconds then add the shrimp in a single layer. Shake the pan to “nestle” the ingredients.

Meanwhile, test the pasta for doneness, and drain into a colander reserving a little of the pasta water on the side.

After about 2 minutes, shake the pan again to loosen any shrimp that may be sticking and turn the shrimp over. Cook 2 minutes more on the second side then add the lemon juice and a couple of tablespoons of the pasta water. Cook another minute and remove the pan from the heat. To finish, stir in the pasta and the basil, gently tossing to combine.

Serve with fresh grated parmesan sprinkled over the pasta.

Enjoy!

Randy

“Absolut” Fish: Pan-Seared Fish with Vodka Lime Butter Sauce, Capers and Fresh Dill

Photo by KathyHuntPhoto.com

This has long been one of my favorite fish recipes. I love the taste of the lime and the capers and the vodka is always an interesting ingredient; together these flavors compliment the fish perfectly. The fresh dill brings a nice finishing touch by adding a fresh bite as well as an attractive visual component. Once you’ve had a little practice it only takes 10 minutes or so to prepare and it’s an impressive and tasty enough dish for company.

Pan-Searing 101

There is really nothing complicated about pan-searing. You may have noticed already, I use the technique a lot. It really is a very convenient way to cook fillets, steaks, or chops when you don’t have hours to spend in the kitchen. What makes pan-searing even more appealing to me is the browning really gives whatever you are cooking a real boost of flavor. Called the Maillard Reaction, this crust of caramelized goodness is the secret behind many delicious restaurant dishes.

With just a couple of key things in mind most anyone can use the pan-searing method, in most any kitchen…

Moisture prevents browning – You will often hear me preach about getting the surface of your fish (or any other protein) dry before searing it. When pan-searing it’s especially important to remember that moisture will inhibit browning. Oil on the other hand promotes browning.

How hot is hot? – Ok, as well as I can describe it; when you heat a pan and add olive oil, then leave the oil to get hot, there is a point just before the oil begins to smoke. At this point the molecules in the oil have loosened or thinned about as much as they are going to and the surface of the oil takes on a shimmering look. That is the right heat for pan-searing.

Wow! That’s really hot! – Always remember: you can move that pan off the fire. Any time you feel your pan might be getting too hot the first step is to simply move it off the burner. Never panic! Be careful and be confident.

Notes: Firm white fish is ready when the fish flakes easily with a fork and the flesh in the center is almost solid white showing very little if any transparency. Remember, fish will continue cooking for a minute or two after you remove it from the heat so be careful not to overcook it. Depending on the thickness of your fillets it should take no longer than 5 to 7 minutes in the oven to finish cooking through.

Side notes: Yes, this recipe contains butter…possibly as much a 1 tablespoon (or pat) per serving which if you think about it really isn’t that much. Once in a blue moon I do allow myself the pleasure and I hope you will too!

Pan-Seared Fish with Vodka Lime Butter Sauce, Capers and Fresh Dill

2 to 4 – (6 Ounce) Firm white fish fillets at least 1” thick. (Such as Mahi-Mahi, Grouper, or Halibut)
¼ Cup – Premium vodka, unflavored
1 Ounce – Fresh squeezed lime juice
2 Tbsp – capers
2 Sprigs – Fresh dill
4 Tbsp – Butter, well chilled, cut into 16 equal cubes
Olive Oil
Kosher salt & fresh ground black pepper

Pre-heat the oven to 400 and use a paper towel to dab the fish to dry it very well. Season both sides with salt & pepper then heat 2 tablespoons of olive oil in a non-stick pan over medium-high heat until shimmering hot. Swirl the pan to evenly coat the cooking surface and carefully place the fish, skin side up / flesh side down, in the pan. Cook 3 minutes (without moving) then gently turn over and cook 3 minutes more. Carefully remove the fish to an oven-proof dish and place it in the oven to finish cooking through.

While the pan is still hot, pour out any excess oil and with the pan still off the heat add the lime juice. Swirl the sizzling juice for about 30 seconds then add the vodka and return the pan to the heat. Simmer, swirling the pan from time to time until the liquid begins to thicken, about 3 minutes. Add 4 of the butter cubes and swirl the pan as they melt.

Reduce the heat to medium and when the first 4 cubes of butter have melted swirl or whisk in 4 more while alternately moving the pan on and off the heat. (Note: The pan should stay hot enough to keep the butter melting but not so hot that the butter burns or separates from the sauce.) When the butter has melted, add the capers along with 4 more butter cubes. Continue gently whisking as the butter melts, finish the sauce by melting the last 4 cubes of butter and set the pan off the heat while you plate the fish.

The fish should be done about the same time as the sauce. Check to make sure the fillets have cooked through, leaving it a little longer if necessary. Carefully (it’s hot!) remove the fish from the oven and place each fillet on a plate. Spoon some of the sauce and the capers over each fillet then use a pair of kitchen shears or scissors to snip a sprinkling of fresh dill over each serving. Serve with a little sprig of dill and a slice of lime on the side.

Enjoy,

Randy


Menu – Fresh Fish Francese with Cool Beans Salad, Zucchini and Yellow Squash

I actually made the dish in the photo one evening while my wife was out of town. After a couple of nights of take-out food I was ready for a real meal so I stopped by Costco on my way home from work. I was happy to find they had one of my favorite fish in the fresh fish section, Corvina! With this beautiful fish and the fresh lemons I already had on hand it wasn’t hard to decide on a theme for my dinner for one.

Often when preparing a meal I look for one common theme that will highlight each part of the menu. Whether it’s garlic, an herb such as thyme or rosemary, or in this case fresh lemon, I use my theme ingredient in each of the dishes I serve. To my thinking this creates a common thread throughout the meal that not only links and compliments the flavors of the food…I think it makes the meal that much more interesting!

The recipes for this menu are written for two but the ingredients can easily be doubled. The Cool Beans Salad is best made ahead of time and refrigerated at least two hours.

Menu – Fresh Fish Francese with Cool Beans Salad, Zucchini and Yellow Squash

For the Cool Beans Salad…

1 – 14.5 oz Can of Cannelloni (white kidney) Beans, rinsed and drained
¼ Cup – Fresh Cucumber, peeled, seeded and cubed
¼ Cup – Fresh Tomato, mostly seeded, and cubed
1 Branch – Celery, diced
1 – Med Shallot, minced (Optional)
1 Tbsp – Fresh Parsley, chopped
1 Packet – Good Seasons Italian All Natural Salad Dressing Mix
½ Cup – Extra Virgin Olive Oil
¼ Cup – Fresh Lemon Juice
3 Tbsp – Fresh Water

In a medium sized mixing bowl combine the first 5 ingredients. Follow the directions on the package for mixing the dressing, using lemon juice in place of the vinegar. Gently toss the salad with only enough dressing to coat. (There should be very little pooling of dressing in the bottom of the bowl.) Chill before serving.

For the Squash…

Two – Med. Zucchini, Halved lengthwise then cut into roughly ¼” slices
Two- Med. Yellow Squash, Halved lengthwise then cut into roughly ¼” slices
1 – Small Onion, Quartered, then sliced
1 – Sprig Fresh Thyme
1 Tbsp – Fresh Lemon Juice
Olive Oil
Kosher Salt & Fresh Ground Black Pepper

Warm 1 tbsp of olive oil in a 10” skillet over medium heat. When the oil begins to shimmer add the onions and cook stirring often until some browning begins to occur. Add the squash (zucchini and yellow) and thyme, and continue cooking.  Stir occasionally until squash is mostly cooked but still a little firm in the center (tender crisp) then season with salt & pepper. Toss with the lemon juice, turn off the heat, and leave the skillet on the burner to stay warm until serving.

For the Fish…

2 Fillets, 4 to 6 ounces each – Fresh Corvina (Grouper, Snapper, or Tilapia may be used)
4 Tbsp – Unbleached or Whole Wheat Flour
2 – Eggs, lightly beaten
Kosher Salt & Fresh Ground Black Pepper
4 Tbsp – Olive Oil

¼ Cup – Dry White Wine
Juice of one half lemon
Slices of one half lemon
2 Tbsp – Unsalted Butter, chilled and cubed into 8 pieces
2 Tbsp – Fresh Herbs such as Parsley or thinly sliced Basil (Pictured)

Heat 4 tbsp olive oil in a large pan over medium high heat until shimmering. Season fish pieces with salt & pepper, dust each with flour (shaking off excess), then dredge in egg to completely coat. Gently and carefully lay the fish into the pan, you should immediately hear sizzling.

Watch fish closely until you can see good browning around the edges, lifting gently after 2 minutes to check the bottom surface. After 2 to 4 minutes, or when the bottom looks nicely browned but not too brown, gently turn the fish over and repeat. Remove the fish to the serving plates. (Note: If your fish is more than ½ inch thick you may want to place it on a sheet pan in a 325 degree oven to finish cooking while you make your sauce.)

Drain any excess oil from the fish pan and discard. Back on the heat, add wine to the pan and whisk to dissolve any brown bits. Boil until about half the wine has evaporated (reduced), then add the lemon juice and 2 lemon slices. Continue boiling, whisking occasionally, until most of the total liquid has reduced and some thickening has begun. (If the liquid seems to boil too rapidly just move the pan off the heat until it is back under control.)

When the liquid has reduced to almost a syrup, remove the lemon slices and turn off the heat. Add the butter 2 or 3 pieces at a time whisking into the sauce as the butter melts. When each addition of butter has completely melted, add the next 2 or 3 pieces until all has been incorporated into the sauce. By the time the last of the butter has been melted the sauce should be just the right consistency. If it is too thick, stir in a splash of wine to loosen…if it is too liquid just let it cook with the residual heat another minute or so. Just before serving stir in the fresh herbs.

Serve the fish with a lemon slice and the sauce and enjoy!

Randy

Menu for Two – Pan Seared Sea Scallops with a Fresh Herb White Wine Sauce, Oven Roasted Potatoes and Asparagus Spears.

Last week my wife Kathy had a rough week fighting the cold that I probably gave her when I had it the week before. Since she was feeling somewhat better by Friday I wanted to cook her something special so I went browsing at Costco for something out of the ordinary. With a crispy salad and some crusty bread, these scallops fit the bill perfectly!

I shop at Costco or BJ’s often as bulk stores are a great way to stretch your grocery bucks. For instance, while you might find nice fat Sea Scallops (nearly always pre-frozen) at a local seafood market or grocery for 12.99 to 15.99 per pound, these came in just over 9.00 per pound for a two pound bag. Two pounds are enough for 3 dinners for the two of us and that boils down to about $6.00 per meal or $3.00 per person. Just try to find that kind of deal at a seafood restaurant!

Speaking of buying frozen seafood; for a very long time I absolutely refused to buy frozen scallops or shrimp. While I wouldn’t consider myself a food snob…I simply did not care for the way the frozen ones tasted when compared to fresh. Then I came across an article about sodium tripolyphosphate . Sodium tripolyphosphate is a preservative that packagers will “claim” is used to “retain tenderness and moisture”. In fact it absolutely ruins the flavor and texture of certain foods, especially shrimp and scallops, giving the flesh a diluted, soapy flavor and an unpleasant spongy, almost waterlogged texture.

So why do seafood packagers use this additive, which is also used in household cleaners, laundry detergent, and paint? The simple answer is Sodium tripolyphosphate “can substantially increase the sale weight of seafood in particular”. Need I say more?

Fortunately, in the U.S., Sodium tripolyphosphate must be listed in the ingredients list on the package label. Also fortunately, Costco and BJ’s both carry frozen shrimp and scallops that do not contain Sodium tripolyphosphate! Do yourself a favor and read the ingredients next time you buy frozen seafood. For the same reason I also try to avoid the “fresh” scallops that are sold soaking in “their own” liquid.

Menu for two – Pan seared sea scallops with a fresh herb white wine sauce, oven roasted baby creamer potatoes and asparagus spears.

Note: Before I get started on the recipe there is one other tip that I must mention: WATER KILLS BROWNING! In searing and roasting the browning that occurs on the outside surface is where the flavor comes from. Searing your scallops while they are wet will prevent them from browning. To get the most flavor from your browned foods always be sure to pat them dry with a paper or dish towel before cooking.

For the Scallops you will need:

12 medium – Sea Scallops, thawed, rinsed, and dried well.
¼ Cup – Dry white wine such as Pinot Grigio or Sauvignon Blanc
Juice of ½ – Fresh lemon
3 Tbsp – Butter, Cut into 6 or 8 cubes, and kept cold.
2 Tbsp – Shallots, minced
2 Tbsp – Fresh basil, sliced in thin ribbons ( see http://www.basilbasics.com/chiffonade.html )
1 Sprig – Fresh rosemary
Italian Herb Seasoning Grinder
Olive Oil

For the Potatoes and Asparagus you will need:

12 – Baby Potatoes, I used half red bliss and half Yukon gold potatoes
12 Large or 16 Medium – Fresh green asparagus spears
Olive Oil
Italian Herb Seasoning Grinder

To Prepare:

1. Preheat the oven to 425 degrees. Rinse and dry the potatoes. Trim the stem end of the asparagus, rinse and dry. When the potatoes are dry toss them with just enough olive oil to coat, give them a good dusting of seasoning from the Italian herb seasoning grinder and toss again. Spread them evenly in a glass 9 X 12 inch baking dish and roast for 15 minutes. Meanwhile, toss the asparagus spears with just enough olive oil to coat, give them a good dusting of seasoning from the Italian herb seasoning grinder and toss again. Set the asparagus aside.

2. Warm 1 to 2 Tbsp olive oil and 1 sprig of rosemary in a non-stick pan over medium high heat swirling the oil occasionally as it heats. Dust the scallops lightly with the Italian herb seasoning.

3. After 15 minutes carefully remove the potatoes from the oven. Carefully tilt the baking dish so that the potatoes move to one side allowing room to add the asparagus spears. Add the asparagus and place the dish back in the oven for 15 minutes longer.

4. While the vegetables finish roasting, sear your scallops: When the oil in the pan is hot the rosemary will begin to crackle and pop. Remove and discard the rosemary then gently place the scallops, one at a time, into the pan. You should hear a distinct sizzling as soon as each scallop hits the oil. Sear the scallops for two minutes on the first side, gently flip, and sear one minute more before removing directly to serving plates. Cover each plate with a paper towel or foil to keep the scallops warm.

5. Remove the vegetables from the oven and set aside to rest.

6. As soon as the last scallop is removed, add the shallots and the wine to the pan. As the wine comes to a boil swirl the pan and, using a wood or silicone spatula, scrape any browned bits from the pan. Reduce until the wine takes on a syrupy consistency then add the lemon juice.

7. Turn off the burner and allow the residual heat to reduce the liquid by half. Gently swirl in the butter cubes 2 or 3 at a time letting these melt before adding 2 or 3 more. Continue swirling the pan until all of the butter has been incorporated, swirl in the basil and spoon the sauce evenly over the scallops.

8. Carefully place the roasted vegetables on the plate and serve.

Enjoy!

Randy