Tag Archives: rosemary

Grilled Fish 101: Two Recipes For The Price Of One!

maybe2

Last weekend I had friends coming over for dinner and I wanted fresh fish. Having not had the opportunity to catch my own recently I did the next best thing and headed for the fish market. Pickings were a little slim at Restaurant Depot but I noticed some large Wahoo fillets. I asked the gentleman behind the counter if I could examine one and he gladly handed me a latex glove.

I laughed and told him that I am bit of a stickler about fish being fresh, then I poked the fillet, squeezed it little to make sure it sprung right back, I even gave it a little sniff. I told him that Wahoo was one of the best fish in the ocean but it absolutely must be fresh! Then I asked him to cut a 4 pound chunk of this perfect fish for me to take home. I smiled a little when as I walked away the guy behind me said “Yeah, I think I would like some of that Wahoo too!”

Freshness truly is half the battle when it comes to fish. The other half is cooking it right! The key with firm and lean fish is to never, ever overcook it. I always say to take the fish off the grill just before it’s cooked through and let it finish on the plate. Believe it or not, fish is so delicate that the heat from cooking will carry over and finish the fish on the plate while still leaving the flesh moist and tender.

To be sure about the doneness I don’t mind using a fork or a knife to check the progress but it’s not always necessary. With fish, especially fish steaks, you can watch the edges turn from translucent to opaque as the fish cooks. When grilling simply keep an eye on the side of the fish and turn it just as the doneness reaches the halfway point. Cook the other side for the same amount of time and viola, you are ready for the plate!

My friend Cyndi asked me for a recipe for this delicious fish and I am going to post not one but two because I couldn’t pick a favorite! Both recipes are exceedingly simple, grilled, and both are perfect for firm lean fish such as Wahoo, Swordfish, Mahi Mahi, or Halibut. The first recipe calls for Za’atar seasoning. This savory spice mix is available at most Middle Eastern, kosher, and halal markets as well as some finer grocery stores. It is one of my favorite spice blends!

Maybe

Grilled Fish with Za’atar and Lemon

Fish steaks or fillets cut into serving portions
Za’atar Seasonings
Fresh lemon juice
Good Olive oil
Salt & Pepper to taste


Preheat a charcoal, gas grill, or grill pan. Sprinkle fish generously on both sides with Za’atar seasonings, drizzle with lemon juice, and olive oil. When the grill is hot soak a paper towel with oil and using tongs, carefully rub to coat the grill with oil. Place the fish on the grill and cook two minutes, turn the fish clockwise 90 degrees and cook two more minutes or until the fish turns white “almost” half way through.


Turn the fish over and repeat removing the fish to a plate just before the fish cooks through to the center. (Use a fork to test if necessary and remove the fish from the grill just as the center turns opaque being careful not to overcook). Drizzle each serving with a little more olive oil and serve.

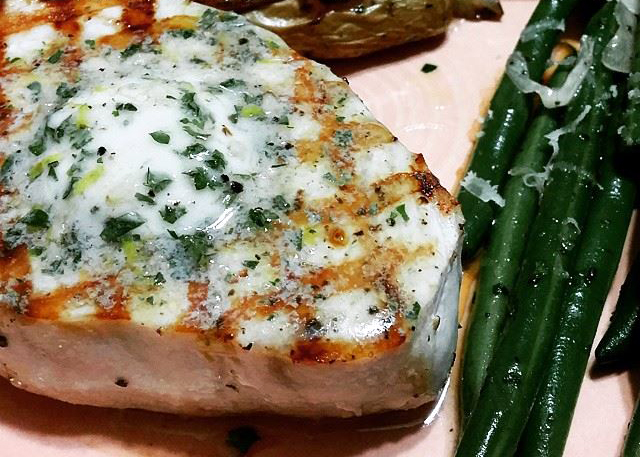
Grilled Fish with Compound Butter

Fish Steaks or Fillets, cut into serving portions
1 Stick (1/2 cup) Unsalted Butter, softened
Zest of ½ a Fresh Lemon
1 Large Clove of Garlic, finely minced
1 Tsp – Fresh Parsley, minced
½ tsp – Fresh Rosemary, minced
½ tsp – Fresh Oregano, minced
½ tsp – Dried Red Pepper, minced
¼ tsp – Fresh Black pepper, ground
¼ tsp – Kosher Salt
Good Olive Oil


Blend butter well with the herbs and spices and wrap it in plastic wrap forming the butter roughly back into a stick. Place the butter in the freezer for 30 minutes or until firm.


Preheat a charcoal, gas grill, or grill pan. Drizzle both sides of the fish with olive oil and sprinkle with salt & pepper. When the grill is hot soak a paper towel with oil and using tongs, carefully rub to coat the grill with oil. Place the fish on the grill and cook two minutes, turn the fish clockwise 90 degrees and cook two more minutes or until the fish turns white “almost” half way through. Turn the fish over and repeat removing the fish to a plate just before the fish cooks through to the center. (Use a fork to test if necessary and remove the fish from the grill just as the center turns opaque being careful not to overcook).


Immediately top each fish portion with a pat (about a tablespoon) of the compound butter so that the heat of the fish melts the butter creating a sauce.

Enjoy!

By Request: Rosemary Grilled Shrimp with Prosciutto with Key Lime Cocktail Sauce

Shrimp (Edit 2)

Rosemary Grilled Shrimp with Prosciutto with Key Lime Cocktail Sauce

What? Shrimp again? Well, football season is now in full swing and I prepared these shrimp at our first Miami Dolphins tailgate party. They were such a hit that I had several requests for the recipe the very next day.

This recipe presents a perfect opportunity to mention “levels of flavor” once again as these shrimp benefit from the flavor boosts of the prosciutto and the rosemary. While they are very good without the prosciutto (and I have made them that way for friends that do not eat pork), the addition of the prosciutto, in all its salty, crispy, goodness, really does add another level of flavor that makes these shrimp a very special treat!

Add to that the fresh rosemary branches used as skewers and while you can certainly use bamboo or metal skewers, taking the extra step and using the rosemary adds a smoky, piney bite as the branches smolder on the grill and again another level of flavor that I think knocks these shrimp right over the top of the flavor scale.

As if those 2 levels of flavor were not enough, along comes the citric acidity of the lime juice and the kick of the horseradish in the Key Lime Cocktail Sauce to again take it to another level and a good dish suddenly becomes the hit of the party. Touchdown!

Key Lime Cocktail Sauce

1 – 12 Oz bottle Prepared Chili Sauce
2 Tbsp – Fresh or bottled Key Lime Juice (I used Nellie & Joe’s from Publix)
1 heaping tablespoon – Prepared horseradish
½ Tbsp – Fresh ground black pepper
1 pinch – Kosher salt

Combine all ingredients and stir to mix well, chill thoroughly before serving.

Rosemary Grilled Shrimp with Prosciutto

2 Lbs Fresh Shrimp – Peeled and deveined
½ Lb – Prosciutto, thin sliced and cut into ½ inch wide strips
Zest of 1 large (or 2 medium) fresh lemon, divided in half
2 cloves – Garlic, grated or minced very fine
2 Tbsp – Dry Sherry
Extra Virgin Olive Oil
1 pinch – Kosher salt
Fresh ground black pepper

4 to 8 – Fresh Rosemary branches, leaves removed (with 2-3 inches of leaves remaining at the tip).

In a medium-sized mixing bowl combine half of the lemon zest with the next 2 ingredients, add a pinch of kosher salt and several good grinds of black pepper (about ½ tsp) then roughly ¼ cup of olive oil. Whisk until the olive oil begins to emulsify (or thicken). Gently toss the shrimp in this mixture until well coated, cover and refrigerate at least 1 hour.

While the grill is heating up, wrap each shrimp individually with a strip of the prosciutto. Using the rosemary branches as skewers, thread the shrimp evenly on 4 to 8 of the skewers (depending on the length of the branches). Drizzle the skewered shrimp with a little more olive oil, sprinkle them evenly with the remaining lemon zest and a few more grinds of black pepper.

Grilled directly over the flames, turning only once, until the prosciutto is crispy and the shrimp are browned and cooked through, about 3-4 minutes per side depending on how hot the grill is. Serve with Key Lime Cocktail sauce and…

Enjoy!

Randy

Menu: Lightly Blackened Scallops with Crispy Prosciutto and an Orange, Rosemary, & White Wine Reduction, Cauliflower Mash with Boursin, & Julienned Snow Peas with Toasted Pine Nuts and Orange Supremes

Photo by Kathyhuntphoto.com

The other night I set out looking for clams to make a fresh clam, broccoli rabe, and sausage dish I had in mind. Alas, I came home with scallops. As funny as that sounds I was a little disappointed that the clams at the two purveyors I visited appeared to have been languishing in their little net bags just a little too long. With all seafood and especially shellfish I am extremely picky about freshness…I had to take a pass on the clams. But being the Friday before Christmas I did want to make a special dinner so Costco and their frozen sea scallops saved the day again. As I’ve mentioned before, I really like these “dry-packed” flash frozen scallops and I still always verify “Ingredients: Sea Scallops”. No salt and definitely no sodium tripolyphosphate!

To prepare these scallops for cooking simply give them a quick rinse, carefully remove the little hard tab of adductor muscle off of the side of each scallop, then dab them with a paper towel to dry. I usually place them on another paper towel set on a plate and refrigerate the scallops while I’m getting everything else ready. Keeping the scallops dry helps to promote browning once the scallops to hit the pan.

In this recipe I use the rosemary and the prosciutto to infuse the olive oil with flavor before cooking the scallops. I found that blackening seasoning alone was a little too much for the delicate scallops but with the flour added the seasonings were perfect and the flour helped form a nice crust. To ensure that even caramelization on the crust try not to move the scallops too much once they are in the pan…set them in, swirling the pan a little to distribute the oil, then leave them alone until you turn them. Timing is important so I suggest preparing the cauliflower first, blanching the snow peas while the cauliflower is steaming. Then while the scallops are cooking it only takes a minute or two to finish the snow peas and process the cauliflower.

Keep your eye out for that clam, broccoli rabe, and sausage recipe…as soon as I can find some decent clams!

Lightly Blackened Scallops with Crispy Prosciutto and an Orange, White Wine, and Rosemary Reduction Sauce

3 – Large dry packed sea scallops per person (Adductor muscles removed)
Juice of 1 Orange, zest reserved
1/8 cup – Dry white wine
3 large or 4 medium sprigs fresh rosemary
1 – Level teaspoon blackening seasonings
1 – Heaping teaspoon whole wheat flour
½ Stick – cold unsalted butter, quartered and cut into 16 cubes
2 Tbsp – Prosciutto, sliced thin then sliced across into 1/8 to ¼ inch strips
Extra virgin olive oil

In a 10 inch non-stick skillet heat 2 Tbsp. of olive oil over medium heat until shimmering. Add ¾ of the fresh rosemary and swirl the pan to cook, pressing the rosemary into the olive oil with a wooden fork from time to time. Cook until the smell of rosemary is permeating the kitchen. (Your family may come in to see what smells so doggone good!)  After 5 minutes or so the rosemary will begin to look brown and crisp. Use the fork to carefully remove the rosemary allowing any excess oil to drain back into the pan. Set the rosemary aside.

Over the same medium heat, add the prosciutto to the pan and stir briskly while shaking the pan to separate the pieces. Cook stirring constantly until the prosciutto begins to brown. When the prosciutto has changed color and appears mostly browned, empty the pan into a strainer, reserving the oil. Once the oil has mostly drained, set the prosciutto on a paper towel to dry (much like bacon). Return the captured oil to the pan and set back on the heat.

Combine the blackening seasonings and the flour and stir to mix. Press both flat sides of each scallop into the flour mixture then place the scallops directly into the pan swirling occasionally to distribute the oil.  Cook the scallops about two minutes, turn and cook two minutes to two and a half minutes more to caramelize before removing to the serving plates. Note: Scallops should be cooked “almost” all the way through when you move them to the plates. The residual heat will finish cooking them while you make the sauce.

Return the pan to the heat and increase the heat to medium high adding the orange juice, the remaining rosemary, and the wine to the pan to deglaze. Allow the liquids to boil swirling the pan occasionally until the sauce comes to a syrupy consistency. When the liquids have mostly reduced and have become syrupy, remove the rosemary. Add the butter 4 cubes at a time swirling the pan (or gently whisking) off the heat to incorporate the melted butter. Return the pan to the heat occasionally to keep the butter melting and repeat until the sauce has thickened and the all of the butter is incorporated.

To serve, drizzle a small amount of the sauce over each scallop then top each with some of the crispy prosciutto and garnish with orange zest.

Cauliflower Mash with Boursin

1 – Small head of Cauliflower
¼ cup – Chicken broth
2 Tbsp – Garlic & herb Boursin cheese
1 Tbsp – Unsalted butter
1 dash – Fresh ground nutmeg
Kosher salt & freshly ground black pepper to taste

Add a steamer basket to a medium sized stew pot along with 1-1/2 cups of water. Place the cauliflower in the steamer basket and bring the pot to a boil over medium high heat. When the water is boiling place a lid on the pot and steam until the cauliflower is quite tender, about 10 minutes.

Move the pot from the heat and very carefully transfer the cauliflower to a food processor with a standard blade. Use a wooden spoon to break up the cauliflower then add the broth, boursin, butter, and nutmeg. Process until smooth, check for seasonings and add salt and fresh ground pepper to taste.

Julienned Snow Peas with Toasted Pine Nuts and Orange Supremes

½ Lb – Snow Peas, julienned (sliced lengthwise into 3 or 4 pieces)
1 heaping Tbsp. – Pine nuts
1 – Small navel orange, cut into supremes ( How to   )
Extra virgin olive oil
Kosher salt & fresh ground black pepper to taste
2 cups – Water

Add water, salt, and the snow peas to a sauce pan over medium high heat. When the water comes to a full boil remove the pan from the heat and strain.

While the peas are draining dry the pan then place it over medium heat for one minute. Add the pine nuts to the dry pan and cook stirring constantly until the nuts begin to brown in spots.

Over the same heat, add 1 Tbsp. of olive oil to the pine nuts and stir in the oranges. As soon as the pan begins to simmer, stir in the snow peas and cook until heated through. Stir in kosher salt and fresh ground black pepper to taste.

Enjoy!

Randy

Fusion Recipe: Orange Beef with Rosemary Soy Sauce

Photo by Kathy

Much like our crock pot, the pressure cooker spends most of the time collecting dust on the bottom shelf of the bakers rack. And, also like the crock pot, every time I use our pressure cooker I end up saying “Man, I love this thing!” Invariably, I make a mental note vowing to use the pressure cooker more often. Considering how this dinner turned out…perhaps it’s time I kept one of those little promises to myself.

Some of my favorite and most beloved comfort foods are stews and braised dishes which are for the most part cooked long and slow. Not exactly weeknight fare if you will. But the pressure cooker brings it all within reach. This dish, prepared traditionally, could take as long as 4 hours to cook; on this night, thanks to the pressure cooker, dinner was on the table in just over an hour. Yep, that’s right; I made this on a Tuesday evening after work in a little more than an hour!

If you are unfamiliar with pressure cooking, there are some great articles on the web with two of my favorite sites being Miss Vickie’s and Fabulous Foods . As a bonus (much like braising) it is claimed that pressure cooking destroys far fewer nutrients than other cooking methods making it a healthy addition to your kitchen arsenal. If you do not own a pressure cooker, by all means start reading up on them…they are safe, convenient and I simply cannot recommend this cooking method enough!

Because pressure cooking happens so fast there is not always time for flavor to develop. To counter this trend I started this recipe cooking hot, almost like a stir fry, because I wanted to build up as much flavor as possible before putting on the lid. I call this recipe a fusion because I used red wine and rosemary which are not typical in an Asian style stew. As an afterthought, a few orange peels would also bump up the “citrusy” flavor and speaking of flavor, feel free to add a little more sriracha if you like things spicy.

I still had a bunch of fresh kale around so I served this stew simply spooned over quick braised kale with a little ginger, garlic, lower sodium soy sauce and a splash of water. Also I will include notes below for a traditional braise for those of you who will not be using a pressure cooker. P.S. If you go out and get one I promise to use my pressure cooker again before it has the time to gather that coat of dust!

Orange Beef with Rosemary Soy Sauce

1-1/2 Pounds – Beef chuck, trimmed and cut into roughly 1” cubes
1 – Medium Onion, halved lengthwise then sliced lengthwise
1 – Medium Daikon radish, peeled and cut into large cubes (the Daikon was about the size of a large cucumber)
½ Cup plus 1/8 Cup reserved – Fresh orange juice
½ Cup – Lower sodium soy sauce
¼ Cup – Dry red wine
3 Cloves – Garlic, minced
1-1/2 Tbsp – Fresh ginger, minced
1-1/2 Tbsp – Agave nectar
2 Sprigs – Fresh rosemary
1 Tbsp – Fish sauce
1 Tbsp – Corn Starch
½ Tbsp – Sriracha (Chinese red pepper sauce)
Fresh ground black pepper, to taste
Sesame oil
Olive oil
Sesame seeds and sliced green onions for garnish

In an uncovered pressure cooker over medium high heat, warm 1-1/2 Tbsp each of Sesame and Olive oil until shimmering. When the oil is quite hot, add the beef cubes and cook, stirring often, until any exuded liquid has evaporated and some browning has occurred. Add the onions and agave nectar to the beef and continue cooking and stirring about 1 minute before adding the garlic and ginger. Allow this to cook, while still stirring often, until the onions are transparent.

When the onions have become transparent stir in the red wine and as this comes to a boil, scrape up any browned bits that may have stuck to the cooking surface. Add all remaining liquid ingredients, the daikon radish cubes and the rosemary (leaving the reserved orange juice aside). Stir gently to mix the ingredients, and then lock on the lid to the pressure cooker.

Leave the heat on medium high until the pressure has reached optimal cooking pressure, then lower the heat to medium low. Cook 30 minutes while monitoring pressure, lowering or raising heat marginally as needed to maintain optimal pressure. After 30 minutes remove the pressure cooker from heat and allow it to cool naturally until the pressure falls to zero.

When the cooker is safe to open, carefully remove most of the stewed solids to a large serving bowl using a spider skimmer or a slotted spoon, leaving the sauce in the cooker. Return the cooker to heat and bring to a boil over medium high heat once more. In a small bowl, whisk the reserved orange juice and the corn starch together to form a slurry before stirring it immediately into the sauce. Continue stirring until the sauce returns to a boil and thickens slightly.

When the sauce has thickened, very gently fold the sauce back into the stew. Serve over brown rice, braised greens, or quinoa and garnish, if desired, with sliced green onions and sesame seeds.

Note: For a traditional braise follow the recipe to the point where the pressure cooker is closed (using a heavy bottomed Dutch oven rather than a pressure cooker). Cover the Dutch oven with a layer of aluminum foil, then a heavy lid and bake in a 325 degree oven for 1-1/2 hours. Check for doneness, re-cover and bake 30 minutes more if necessary. Then follow the recipe from the point at which the pressure cooker is opened.

Enjoy,

Randy

Chicken Penne Mediterranean

Boneless skinless chicken breast can be so boring sometimes! Yesterday morning I had taken two frozen breast halves out to thaw and thought all day about how I was going to prepare them; I ran the gamut from simple and uncomplicated to full blown kitchen chemistry lab. By the time I left work I had in my mind visited Italy, Spain, and the South of France, stopped off in Ireland for a while and even hung out in Mexico and the Deep South!

When I finally got to the grocery store I was feeling totally uninspired so I picked up salad ingredients and a bottle of Pinot Grigio and headed home. I figured I would cook the chicken simply, using whatever I could dig up in the pantry. Then as I dug around I began to form an idea; I had zucchini that needed to be used, pasta, a giant jar of capers, Spanish olives, a can tomatoes and bingo that was it…We were going to the Mediterranean!

Drawing on fond memories of Snapper Veracruz and Pasta Puttanesca recipes I had prepared in the past I landed somewhere between simple and a science experiment. I cooked the chicken separately from the sauce because oftentimes when chicken is cooked in a liquid, it produces an unappealing protein scum (for lack of a better description). This also allowed for a good browning of the meat, assisted by a little tomato paste, that really added a richness to the final product. The anchovy paste and the final tablespoon of capers also boosted the flavor of the sauce.

Note: If it seems your sauté pan is not large enough to hold everything use a large bowl to fold together, the sauce and the pasta.

Chicken Penne Mediterranean

1 – 28 Oz Can, Peeled Whole Tomatoes
2 – Lg. Boneless, Skinless Chicken Breast Halves, trimmed and cut in ¾ to 1 inch chunks
8 Oz – Whole Wheat Penne
2 – Med. Zucchini, halved lengthwise then sliced
1 – Med Onion, Quartered then sliced
1 – Small Carrot, finely grated
¼ Cup – Capers, 1 Tbsp reserved
¼ Cup – Green Spanish Olives, pitted
¼ Cup – Dry White Wine
¼ Cup – Balsamic Vinegar
¼ Cup – Chicken Stock
1 Tbps – Tomato Paste
1 Branch – Celery, sliced
3 Cloves – Garlic, minced (divided)
1 Lg. Sprig – Fresh Rosemary
1 tsp. – Dried Oregano
¼ tsp – Anchovy Paste (Optional)
Fresh Ground Pepper
Fresh Ground – McCormick’s Italian Seasoning Grinder
Olive Oil
Fresh Parmigiano-Reggiano, shaved

In a large sauté pan over med heat warm 4 Tbsp. of olive oil until shimmering. Add 2 cloves minced garlic, anchovy paste and about ¼ Tbsp. of ground Italian seasonings to the pan and sauté 1 minute, stirring. Stir in onions and celery and cook stirring occasionally until the onions begin to turn translucent. Stir in the carrots, rosemary, and oregano, and cook 5 minutes more, stirring occasionally.

Add the wine and allow it to come to a boil, scraping up any browned bits that have stuck to the pan. Add the tomatoes, carefully crushing them as you add them to the pan. Add the capers and olives and allow the sauce to come to a boil once again. Reduce the heat to a steady simmer and cook 30 minutes. Stir in balsamic vinegar and continue simmering.

Meanwhile warm 1 Tbsp of olive oil in a large non-stick pan over high heat. When oil is shimmering, add 1 clove of garlic and stir briskly, 30 seconds. Stir in chicken and cook stirring for 1 minute then add the tomato paste. Continue cooking, stirring often until the chicken has browned and just cooked through. Add the cooked chicken, zucchini, and chicken stock to the sauce and continue simmering until the zucchini is just cooked through. Season to taste with fresh ground black pepper and remove and discard the rosemary sprig.

While sauce is simmering, bring a large pot of salted water to a boil, add pasta and cook per package instructions. When the pasta is cooked to your liking, drain (do not rinse!) in a colander and fold the pasta, along with the reserved tablespoon of capers, into the sauce. Serve garnished with shaved parmesan.

Enjoy,

Randy

Menu for Two – Pan Seared Sea Scallops with a Fresh Herb White Wine Sauce, Oven Roasted Potatoes and Asparagus Spears.

Last week my wife Kathy had a rough week fighting the cold that I probably gave her when I had it the week before. Since she was feeling somewhat better by Friday I wanted to cook her something special so I went browsing at Costco for something out of the ordinary. With a crispy salad and some crusty bread, these scallops fit the bill perfectly!

I shop at Costco or BJ’s often as bulk stores are a great way to stretch your grocery bucks. For instance, while you might find nice fat Sea Scallops (nearly always pre-frozen) at a local seafood market or grocery for 12.99 to 15.99 per pound, these came in just over 9.00 per pound for a two pound bag. Two pounds are enough for 3 dinners for the two of us and that boils down to about $6.00 per meal or $3.00 per person. Just try to find that kind of deal at a seafood restaurant!

Speaking of buying frozen seafood; for a very long time I absolutely refused to buy frozen scallops or shrimp. While I wouldn’t consider myself a food snob…I simply did not care for the way the frozen ones tasted when compared to fresh. Then I came across an article about sodium tripolyphosphate . Sodium tripolyphosphate is a preservative that packagers will “claim” is used to “retain tenderness and moisture”. In fact it absolutely ruins the flavor and texture of certain foods, especially shrimp and scallops, giving the flesh a diluted, soapy flavor and an unpleasant spongy, almost waterlogged texture.

So why do seafood packagers use this additive, which is also used in household cleaners, laundry detergent, and paint? The simple answer is Sodium tripolyphosphate “can substantially increase the sale weight of seafood in particular”. Need I say more?

Fortunately, in the U.S., Sodium tripolyphosphate must be listed in the ingredients list on the package label. Also fortunately, Costco and BJ’s both carry frozen shrimp and scallops that do not contain Sodium tripolyphosphate! Do yourself a favor and read the ingredients next time you buy frozen seafood. For the same reason I also try to avoid the “fresh” scallops that are sold soaking in “their own” liquid.

Menu for two – Pan seared sea scallops with a fresh herb white wine sauce, oven roasted baby creamer potatoes and asparagus spears.

Note: Before I get started on the recipe there is one other tip that I must mention: WATER KILLS BROWNING! In searing and roasting the browning that occurs on the outside surface is where the flavor comes from. Searing your scallops while they are wet will prevent them from browning. To get the most flavor from your browned foods always be sure to pat them dry with a paper or dish towel before cooking.

For the Scallops you will need:

12 medium – Sea Scallops, thawed, rinsed, and dried well.
¼ Cup – Dry white wine such as Pinot Grigio or Sauvignon Blanc
Juice of ½ – Fresh lemon
3 Tbsp – Butter, Cut into 6 or 8 cubes, and kept cold.
2 Tbsp – Shallots, minced
2 Tbsp – Fresh basil, sliced in thin ribbons ( see http://www.basilbasics.com/chiffonade.html )
1 Sprig – Fresh rosemary
Italian Herb Seasoning Grinder
Olive Oil

For the Potatoes and Asparagus you will need:

12 – Baby Potatoes, I used half red bliss and half Yukon gold potatoes
12 Large or 16 Medium – Fresh green asparagus spears
Olive Oil
Italian Herb Seasoning Grinder

To Prepare:

1. Preheat the oven to 425 degrees. Rinse and dry the potatoes. Trim the stem end of the asparagus, rinse and dry. When the potatoes are dry toss them with just enough olive oil to coat, give them a good dusting of seasoning from the Italian herb seasoning grinder and toss again. Spread them evenly in a glass 9 X 12 inch baking dish and roast for 15 minutes. Meanwhile, toss the asparagus spears with just enough olive oil to coat, give them a good dusting of seasoning from the Italian herb seasoning grinder and toss again. Set the asparagus aside.

2. Warm 1 to 2 Tbsp olive oil and 1 sprig of rosemary in a non-stick pan over medium high heat swirling the oil occasionally as it heats. Dust the scallops lightly with the Italian herb seasoning.

3. After 15 minutes carefully remove the potatoes from the oven. Carefully tilt the baking dish so that the potatoes move to one side allowing room to add the asparagus spears. Add the asparagus and place the dish back in the oven for 15 minutes longer.

4. While the vegetables finish roasting, sear your scallops: When the oil in the pan is hot the rosemary will begin to crackle and pop. Remove and discard the rosemary then gently place the scallops, one at a time, into the pan. You should hear a distinct sizzling as soon as each scallop hits the oil. Sear the scallops for two minutes on the first side, gently flip, and sear one minute more before removing directly to serving plates. Cover each plate with a paper towel or foil to keep the scallops warm.

5. Remove the vegetables from the oven and set aside to rest.

6. As soon as the last scallop is removed, add the shallots and the wine to the pan. As the wine comes to a boil swirl the pan and, using a wood or silicone spatula, scrape any browned bits from the pan. Reduce until the wine takes on a syrupy consistency then add the lemon juice.

7. Turn off the burner and allow the residual heat to reduce the liquid by half. Gently swirl in the butter cubes 2 or 3 at a time letting these melt before adding 2 or 3 more. Continue swirling the pan until all of the butter has been incorporated, swirl in the basil and spoon the sauce evenly over the scallops.

8. Carefully place the roasted vegetables on the plate and serve.

Enjoy!

Randy

Country Style Pork Ribs Braised in Wine and Garlic

OK Ladies, make this one for your man and he will be volunteering to do the dishes! This is one of my favorite easy recipes and there are always plenty of leftovers for lunch.

You don’t need an expensive, ceramic Dutch Oven to make tasty and tender braised dishes; If you don’t have a Dutch Oven try cooking this in a large skillet with a snug fitting lid. For braising, just before putting the dish in the oven, cover the skillet with foil then place the lid on gently but firmly to create a good seal. Similar to pressure cooking this traps in the moisture and adds steam to the cooking equation which results in a moist and very tender end product.

Country Style Pork Ribs Braised in Wine and Garlic

4 to 6 – Country Style Pork Ribs, trimmed of excess fat
1 Cup – Dry White Wine (such as Pinot Grigio)
2 Lg Cloves – Garlic, minced
1 Lg or 2 Med – Sprigs Fresh Rosemary
Kosher Salt
Fresh Ground Black Pepper
2 Tbsp – Olive Oil

Preheat the oven to 325 degrees.

On the stovetop heat a heavy bottomed Dutch Oven (or an oven proof Saute Pan with a tight fitting lid) over medium high heat. Meanwhile coat the ribs generously with Salt and Pepper.

Add the oil to the Dutch Oven and heat until the oil is just beginning to smoke then carefully add the ribs browning them well on all sides (about 3 – 4 minutes per side). Remove them to a plate when well browned.

Add the garlic to the pan and stir briskly for about 1 minute then add the wine. Allow the wine to come to a boil while scraping any browned bits loose from the pan. Cook about one minute more.

Return the ribs to the Dutch Oven, add the rosemary sprigs and cover tightly. Carefully place the Dutch Oven in the oven and bake for one hour. Check the ribs for tenderness, cover and bake 20 minutes more if necessary.

Remove the Dutch Oven from the oven, uncover, and allow the ribs to rest 10 minutes before serving, basting occasionally with the pan sauce.

Serve and enjoy!

Randy