
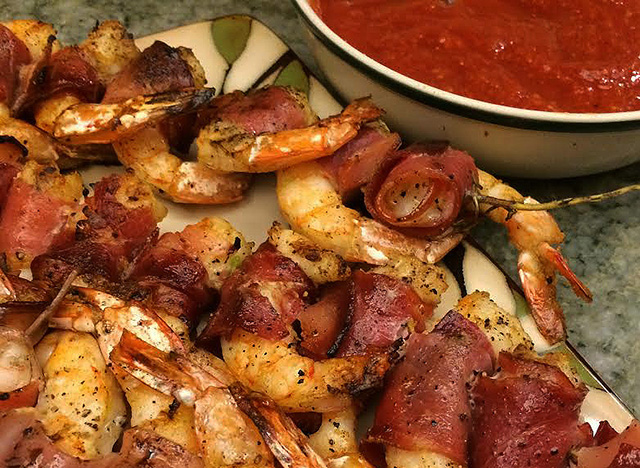
Rosemary Grilled Shrimp with Prosciutto with Key Lime Cocktail Sauce
What? Shrimp again? Well, football season is now in full swing and I prepared these shrimp at our first Miami Dolphins tailgate party. They were such a hit that I had several requests for the recipe the very next day.
This recipe presents a perfect opportunity to mention “levels of flavor” once again as these shrimp benefit from the flavor boosts of the prosciutto and the rosemary. While they are very good without the prosciutto (and I have made them that way for friends that do not eat pork), the addition of the prosciutto, in all its salty, crispy, goodness, really does add another level of flavor that makes these shrimp a very special treat!
Add to that the fresh rosemary branches used as skewers and while you can certainly use bamboo or metal skewers, taking the extra step and using the rosemary adds a smoky, piney bite as the branches smolder on the grill and again another level of flavor that I think knocks these shrimp right over the top of the flavor scale.
As if those 2 levels of flavor were not enough, along comes the citric acidity of the lime juice and the kick of the horseradish in the Key Lime Cocktail Sauce to again take it to another level and a good dish suddenly becomes the hit of the party. Touchdown!
Key Lime Cocktail Sauce
1 – 12 Oz bottle Prepared Chili Sauce
2 Tbsp – Fresh or bottled Key Lime Juice (I used Nellie & Joe’s from Publix)
1 heaping tablespoon – Prepared horseradish
½ Tbsp – Fresh ground black pepper
1 pinch – Kosher salt
Combine all ingredients and stir to mix well, chill thoroughly before serving.
Rosemary Grilled Shrimp with Prosciutto
2 Lbs Fresh Shrimp – Peeled and deveined
½ Lb – Prosciutto, thin sliced and cut into ½ inch wide strips
Zest of 1 large (or 2 medium) fresh lemon, divided in half
2 cloves – Garlic, grated or minced very fine
2 Tbsp – Dry Sherry
Extra Virgin Olive Oil
1 pinch – Kosher salt
Fresh ground black pepper
4 to 8 – Fresh Rosemary branches, leaves removed (with 2-3 inches of leaves remaining at the tip).
In a medium-sized mixing bowl combine half of the lemon zest with the next 2 ingredients, add a pinch of kosher salt and several good grinds of black pepper (about ½ tsp) then roughly ¼ cup of olive oil. Whisk until the olive oil begins to emulsify (or thicken). Gently toss the shrimp in this mixture until well coated, cover and refrigerate at least 1 hour.
While the grill is heating up, wrap each shrimp individually with a strip of the prosciutto. Using the rosemary branches as skewers, thread the shrimp evenly on 4 to 8 of the skewers (depending on the length of the branches). Drizzle the skewered shrimp with a little more olive oil, sprinkle them evenly with the remaining lemon zest and a few more grinds of black pepper.
Grilled directly over the flames, turning only once, until the prosciutto is crispy and the shrimp are browned and cooked through, about 3-4 minutes per side depending on how hot the grill is. Serve with Key Lime Cocktail sauce and…
Enjoy!
Randy


